8. Setting up SAML Authentication
8.1 About Secure Assertion Markup Language (SAML)

SAML authentication allows you to use a Single Sign-On service to handle user authentication into OVERLAPS rather than the usual login form or Windows Integrated Authentication. Examples of Single Sign-On providers which support SAML are:
- Active Directory's ADFS service
- Microsoft Entra
- Okta
- ... and more
Two terms to become familiar with are Service Provider (SP), which refers to OVERLAPS in this instance, and Identity Provider (IdP) which is the SAML request consumer service and assertion issuer for Single Sign-On. Basically, when a user wants to login, the SP issues an Authn Request to the IdP which presents the user with their own login page/mechanism. Once the IdP is content that the user is who they say they are, it creates an Assertion which it sends back to the SP via the user's browser. OVERLAPS (the SP) can then read this assertion and complete the user's login process.
Okta provide a very clear and indepth description of the mechanics behind SAML authentication which you can read about here.
Setting up SAML authentication is relatively simple on OVERLAPS' side (though the IdP experience may vary depending on the service), and consists of these steps:
- Configure your Entity ID, Return Address, and Signing Certificate. The former two of these should be automatically populated using existing host information, but can be changed if needed. This information needs to be saved before proceeding to the metadata step.
- Copy the OVERLAPS server's Metadata URL from the SAML Configuration window.
- Setup a new application on your IdP and either paste the link to the metadata if they support it, or download the XML file and provide that.
- Configure your IdP's Claim Issuance Policy so that the user's Email Address is returned as the NameID. This is particularly important in multi-domain environments as OVERLAPS will need to know which domain the user is a member of to confirm their details, so either an email address of fully qualified username (domain/username) are required. Please refer to your IdP's documentation on how to do this, but some examples will be shown below.
- Get your IdP's own metadata.xml URL for importing into OVERLAPS
- Add a new Identity Provider
- Give it a name and description. These are only used for identification purposes in OVERLAPS.
- Set a priority. If you have multiple IdPs then this controls which one is selected to authenticate the user (depending on your settings). The lower the number, the higher the priority.
- Either paste the IdP's metadata link into the appropriate box and click "Refresh" to download and set all of the relevant settings (the easy way), or specify the IdP's Entity ID, Sign-On and Log-Out endpoints, and certificates manually.
- (Optionally) if you have multiple IdPs and want to use Email Address Matching to dictate which one users use when logging in, set up rules for this matching process.
8.2 SAML Configuration Modal
Clicking the "Open SAML2 Configuration" button opens OVERLAPS SAML configuration window, the sections of which are detailed below.
8.2.1 Service Provider (SP) Required Details
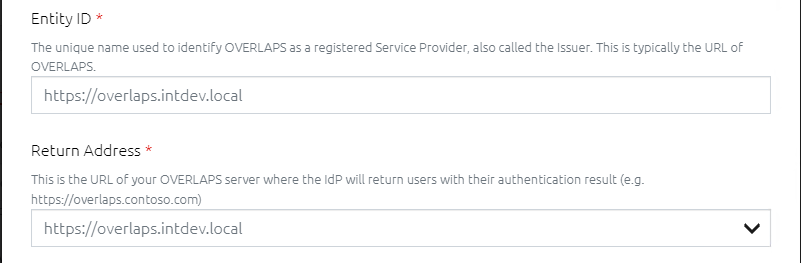
8.2.1.1 Entity ID
This is a unique identifier for OVERLAPS as a Service Provider, which your Identity Provider (IdP) will expect to match the one it has on record. Technically this can be any string, but typically it is the URL of your OVERLAPS instance.
8.2.1.2 Return Address
The URL of your OVERLAPS instance that the IdP will return the user to once authentication has been completed.
8.2.2 OVERLAPS Signing Certificate

This is a Private Key certificate installed in the server's Personal or Trusted Root Certification Authority stores that can be used for:
- Signing Authn requests before they are sent to the IdP. The IdP, which will have the public key part of the certificate, can then verify the signature to confirm it came from a trusted source.
- The IdP can encrypt its Assertion in the SAML Response using the same public key so that only the OVERLAPS server can decrypt and read the Assertion.
To select a certificate, click the Browse button, you will be presented with a list of available certificate which, by default, have the OVERLAPS server as either the Subject or the Subject Alternative Name in the certificate.

If you want to use a certificate which doesn't match this criteria, click the "If you cannot see your certificate..." link to display all valid certificates in the Personal or Trusted Root stores.
If you have a password field in this dialog box (version 3.3.0), this is not used for reading the private key from the Store, but instead for protecting it if it is exported.
This is a legacy setting from when importing a certificate from a file was being tested, and has been removed in update 3.3.1. If you are on version 3.3.0 and have the password field, entering any strong password will work.
8.2.3 OVERLAPS SAML Metadata URL

If you want to configure an application for OVERLAPS on your Identity Provider (IdP) automatically, once the above options have been saved, you can use this metadata link to provide the IdP with most of the settings. Some IdPs are able to accept a link to this metadata and process it directly, others will require you to download the XML file and either upload it to them or copy and paste it into a form.
The Metadata XML file does not contain any sensitive information, mainly consisting of:
- The Entity ID of the OVERLAPS Server.
- The Public Key part of its signing certificate.
- Destination information for returning users from Single Sign-On and Single Log-out requests.
8.2.4 Service Settings
These settings dictate how SAML authentication will work once your IdP is configured to handle the requests.
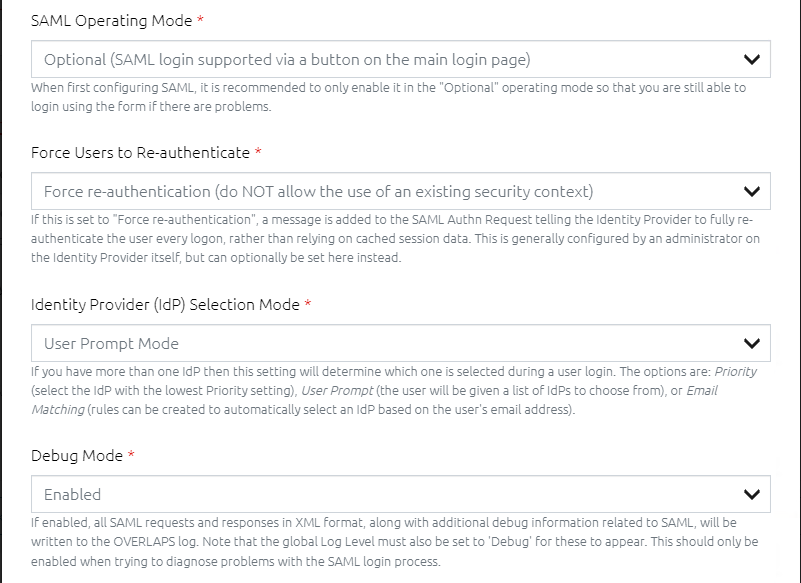
8.2.4.1 SAML Operating Mode
This specifies the overall operational status of SAML in OVERLAPS. Your options are:
SAML authentication is completely disabled.
A SAML authentication button is added to the login screen which the user must click to initiate the authentication process. The login form and Windows Authentication login options are still available. This should be the mode used during initial configuration so that you can still easily login and make changes to settings if the SAML authentication process is not working.
SAML authentication is enforced, the login page isn't shown and users will be immediately redirected to the IdP login page. This setting does not currently work well when you have multiple IdPs because only the priority system is used to select which one to use.
8.2.4.2 Force Users to Re-authenticate
If this is enabled, the Authn Request will include an instruction to the IdP that the user cannot use a previous authentication session to login automatically, and that they must re-authenticate before proceeding. This is more secure, but at the expense of your user experience.
8.2.4.3 Identity Provider (IdP) Selection Mode
If you have multiple IdPs then this will specify how one is selected for a user during the authentication process.
The IdP with the lowest "Priority" number will be used. If more than one have the same priority then it will depend on the order they were added to OVERLAPS.
The user is shown a list of available IdPs to select from as shown here:
The user is prompted for their email address, then Email Matching Rules are used to match the email to a particular IdP. If no matches are found, the process falls back on the priority selection method.
8.2.4.4 Enable Single Logout
By default, when a user logs out of OVERLAPS after authenticating via SAML, they will be sent to the IdP to perform a full Single Logout (SLO) as well. This is to prevent the user's browser from being able to log back in at the click of a button. However, if you wish to disable this behaviour, you can do so by setting this to Disabled.
8.2.4.5 Debug Mode
This may be useful during your initial SAML configuration as it outputs a significant amount of extra information to the log file, including the raw XML of SAML Requests and Responses from the IdP. It should be disabled during normal operation however.
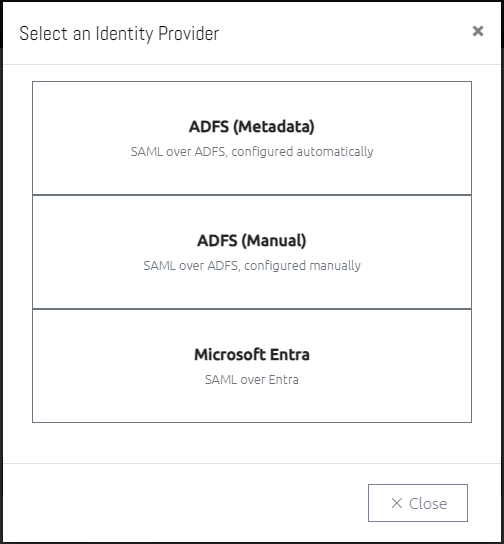
8.3 Identity Provider Setup
Each Identity Provider will have its own settings and terminology, but they should provide reasonable documentation for setting up a new Application for SAML authentication. We've selected two popular options to showcase below as an example.
8.3.1 Claim Issuance Policy Note
OVERLAPS requires your IdP to return the users Email Address as the NameID property in its Assertion. This is because, in multi-domain environments, OVERLAPS uses the domain part of the email address to determine which domain it should lookup the user in. Alternatively it is acceptable to return the NameID in domain/username format.
8.3.2 Active Directory ADFS
Documentation Link (learn.microsoft.com)
- Go to the Relying Party Trusts folder, right click it and select Add Relying Party Trust....
- Select Claims Aware and click Start.
- Enter the OVERLAPS metadata URL from above, click Next.
- Enter a display name or leave it as the default, enter any notes you may need for future reference. Click Next.
- Configure your Access Control Policy as needed. OVERLAPS confirms that users have been granted to its services itself, so won't allow logins from non-OVERLAPS-users. If you need to enforce MFA, this can be done here as well. Ensure that the Access Control Policy configuration aligns with your organization's security policies and requirements. Click Next.
- In the Ready To Add Trust section, confirm that everything seems correct and in order.
- Click Finish.
- Under the Service -> Endpoints folder, scroll down to the Metadata category and look for the entry of Type Federation Metadata. This is the URL of your ADFS SAML metadata XML file, make a note of this for future use when importing the IdP into OVERLAPS. When added to the server's address it will be something like: https://adfs.contoso.com/FederationMetadata/2007-06/FederationMetadata.xml. Verify that this is correct and that you can access from a web browser.
8.3.2.1 ADFS Claim Issuance Policy
- Right click the newly created Relying Party Trust and click Edit Claim Issuance Policy.
- Click Add Rule.
- Select Send LDAP Attributes as Claims, click Next.
- Give the claim an appropriate name, something like Email Address to NameID.
- Select Active Directory in the Attribute Store.
- In the left column (LDAP Attribute), select E-Mail-Addresses.
- In the right column (Outgoing Claim Type), select Name ID.
- Click Finish.
8.3.3 Microsoft Entra
Documentation Link (learn.microsoft.com)
- In the Entra Admin Center, navigate to Applications -> Enterprise Applications.
- Click New Application.
- Click Create Your Own Application.
- Give the application a recognisable name, and select Integrate any other application you don't find in the gallery (Non-gallery), then click Create.
- Assign users and groups and setup the application according to your requirements.
- Click on the Single Sign-On section.
- Select SAML.
- Click Upload metadata file.
- Upload the metadata.xml file downloaded from OVERLAPS.
- Verify the imported information looks correct and click Save.
- Make a note of the App Federation Metadata Url for importing into OVERLAPS.
8.3.3.1 Entra Claim Issuance Policy
- Under Attributes & Claims, click Edit.
- Click the Unique User Identifier (Name ID) field under Required Claim.
- Change the Source Attribute (default user.userprincipalname) to user.mail, then click Save.
8.3.4 Other Resources
- Okta - Create SAML app integrations (help.okta.com)
- jumpcloud - Get Started: SAML Single Sign-on (SSO) (jumpcloud.com)
- PingIdentity - Creating a SAML application (docs.pingidentity.com)
8.4 Identity Provider (IdP) List
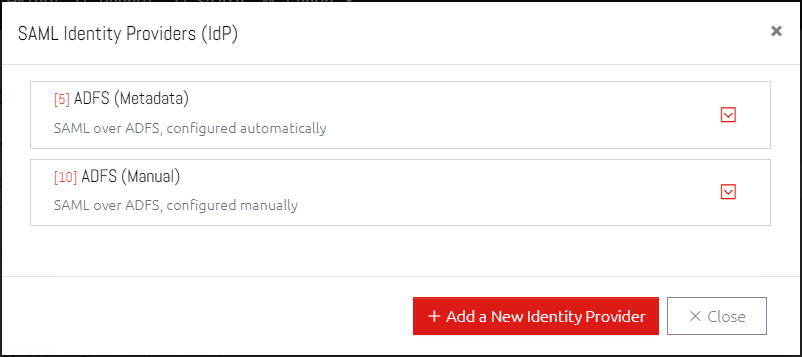
The settings for each IdP is shown in its own expandable box, and saving any individual IdP does not make any changes to the others. Click Add a New Identity Provider to start the process of adding an IdP, or click an existing one to change its settings (if any exist).
8.4.1 IdP Configuration
8.4.1.1 Name, Description and Priority
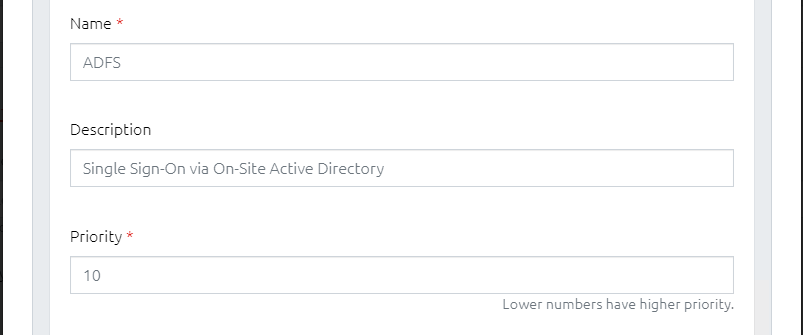
Give the IdP a recognisable name and description for easy identification later. The Priority is a number used if more than one IdP is used to determine which one should be selected for an authentication process, where lower numbers are selected first.
8.4.1.2 AuthN Context Classes Comparison Type
How the AuthN Request's context classes should be handled by the server. Available options are:
- "Exact" (default) - The resulting authentication context must match at least one of the contexts set below,
- "Minimum" - The resulting context must be at least as strong as one of the context below,
- "Better" - The resulting context must be stronger that any one of the contexts below,
- "Maximum" - The resulting context must be as strong as possible without exceeding the strength of the contexts below.
For more information, refer to the SAML specification.
8.4.1.3 AuthN Context Classes
An ordered list of valid authentication schemes that the IdP supports and that are acceptable forms of authentication for OVERLAPS. By default, OVERLAPS will set this to "urn:oasis:names:tc:SAML:2.0:ac:classes:PasswordProtectedTransport", which is widely accepted Forms based authentication. However, depending on your needs or the options provided by your IdP, you may want to change this or add other schemes.
You can add as many scheme's Class URIs are you need, one per line.
Common values are shown here:
| Authentication Scheme Name | Context Class URI |
|---|---|
| Internet Protocol (IP) | urn:oasis:names:tc:SAML:2.0:ac:classes:InternetProtocol |
| Internet Protocol Password (IP Password) | urn:oasis:names:tc:SAML:2.0:ac:classes:InternetProtocolPassword |
| Kerberos | urn:oasis:names:tc:SAML:2.0:ac:classes:Kerberos |
| Mobile One-Factor Unregistered | urn:oasis:names:tc:SAML:2.0:ac:classes:MobileOneFactorUnregistered |
| Mobile Two-Factor Unregistered | urn:oasis:names:tc:SAML:2.0:ac:classes:MobileTwoFactorUnregistered |
| Mobile One-Factor Contract | urn:oasis:names:tc:SAML:2.0:ac:classes:MobileOneFactorContract |
| Mobile Two-Factor Contract | urn:oasis:names:tc:SAML:2.0:ac:classes:MobileTwoFactorContract |
| Password | urn:oasis:names:tc:SAML:2.0:ac:classes:Password |
| Password Protected Transport | urn:oasis:names:tc:SAML:2.0:ac:classes:PasswordProtectedTransport |
| Previous Session | urn:oasis:names:tc:SAML:2.0:ac:classes:PreviousSession |
| X.509 Public Key Infrastructure (X509) | urn:oasis:names:tc:SAML:2.0:ac:classes:X509 |
| PGP | urn:oasis:names:tc:SAML:2.0:ac:classes:PGP |
| Secure Remote Password (SRP) | urn:oasis:names:tc:SAML:2.0:ac:classes:SecureRemotePassword |
| Spoke Authentication | urn:oasis:names:tc:SAML:2.0:ac:classes:Spoke |
| Time Sync Token | urn:oasis:names:tc:SAML:2.0:ac:classes:TimeSyncToken |
| Windows Authentication | urn:federation:authentication:windows |
| Federated Identity | urn:oasis:names:tc:SAML:2.0:ac:classes:FederatedIdentity |
This dictates the way your users can authenticate against your IdP and could be very dangerous if configured incorrectly. If there are any doubts, consult the SAML standard documentation for more information, and always test your implementation thoroughly.
By default, OVERLAPS will check that the SAML Response from your IdP contains information about the context class used to authenticate the user, and that that class is in this list. If another scheme was used during authentication, OVERLAPS will reject the login process. Similarly, if the IdP refuses to specify the scheme in its Response (sending "unspecified" in its place), it will reject the login attempt.
Some authentication schemes (possibly YubiKey and/or Windows Hello) may cause the IdP to return "unspecified" however (or more specifically "urn:oasis:names:tc:SAML:2.0:ac:classes:unspecified"). To get around this, add this to the AuthN Context Classes list and change the "RejectAuthnUnspecifiedContext" setting in the Configuration Utility to False.
8.4.1.4 IdP Metadata URL and Auto-Update
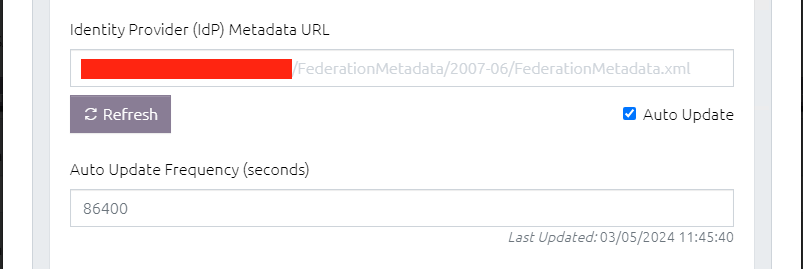
The simplest way to setup an IdP is to use its Federation Metadata URL to simply import everything that is needed directly into OVERLAPS. To do this, enter the URL here and click the Refresh button.
Specifying the Auto Update Frequency tells OVERLAPS how often it should re-download the metadata to check for changes, but this doesn't generally need to happen very often. By default this will occur once every 86,400 seconds (24 hours).
If you would prefer to configure your IdP settings manually, then continue with the below options. Otherwise, you can skip ahead to Email Matching Rules
8.4.1.5 Identity Provider Entity ID

The unique ID of the IdP, which you will find as an attribute of the first line (EntityDescriptor) of its metadata.xml. This will usually be the URL of the IdP. In ADFS, for example, this ends "/adfs/services/trust".
8.4.1.6 Single Sign-On and Sign-Out (Log-Out) URLs
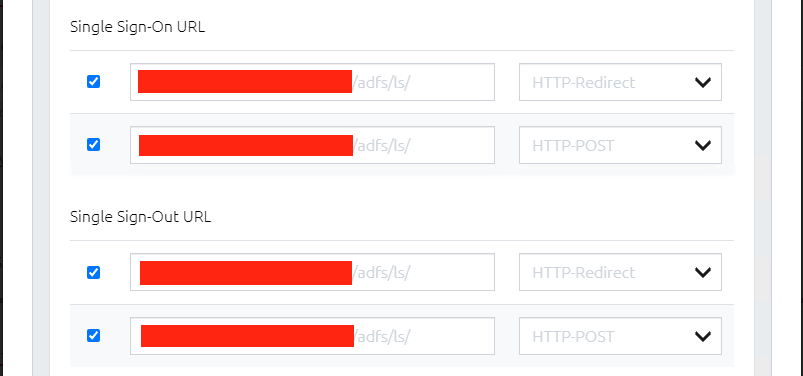
OVERLAPS supports both Redirect and POST SAML bindings for Sign-On and Log-Out. If you're using the IdP's metadata then these properties will be automatically populated, but you can use the checkboxes to enable/disable individual bindings if needed. Note that each IdP requires at least one enabled Sign-On and one Sign-Out binding to work.
8.4.1.7 Identity Provider Signing/Decryption Certificates

The IdP will have one or more X509 certificates which it uses to sign and encrypt message data. OVERLAPS requires the public keys of these certificates in order to verify signatures and to (optionally) encrypt Authn requests. If using the IdP's metadata, the certificate(s) will be automatically read and stored here.
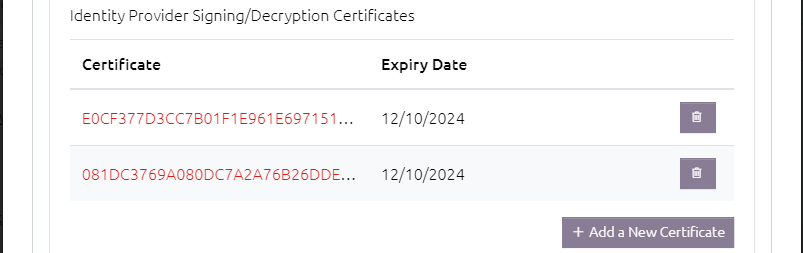
If you are not using the metadata, then you can add certificates by clicking the "Add a New Certificate" button and pasting the public key's PEM formatted certificate string into the box provided.
8.4.1.7.1 IdP Certificate Storage
The IdP server's certificates need to be installed into the computer's Trusted People store prior to the use of SAML. Whether you are using the metadata or adding certificates manually, OVERLAPS will check the store and add the certificates if they are not found there already.
8.5 Email Matching Rules
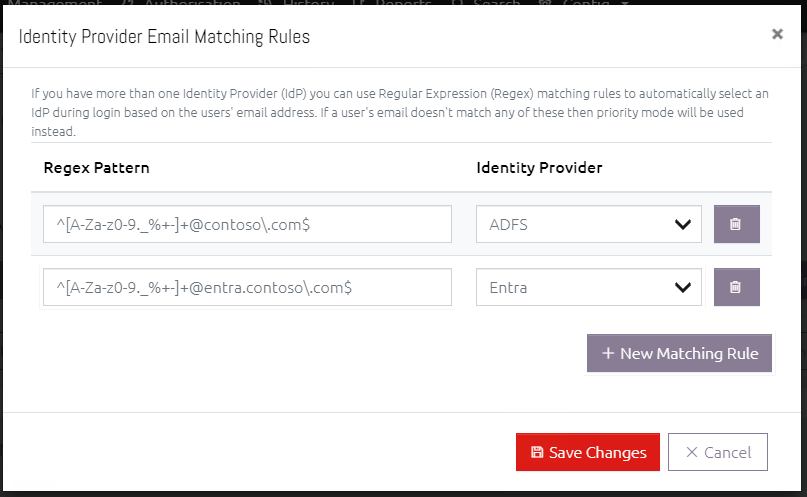
If you have more than one IdP and want to use elements of the user's email address to assign them to the correct one, you can define Email Matching Rules to achieve this. In the IdP Selection Mode setting, select "Email Matching Mode", and use the rules dialog to specify Regular Expression (Regex) patterns for matching an email address and which IdP they should use.
Prior to login, users will be prompted for their email address and an IdP will be selected accordingly. If the email address doesn't match any of the rules, Priority Mode will be used instead.
The email address will be included in the Authn Request so that your IdP can automatically populate their login field if they support this feature (ADFS does not).
8.6 Other Information
8.6.1 Users complete login on the IdP, get redirected, but just end up back at the login page again
This commonly has to do with HTTP 302 redirects causing session cookies to be lost due to cross-domain restrictions. We deliberately don't use redirects during the successful return from authentication for specifically this reason, but cannot control what third-partys may do. If you find this happening, we have provided an option accessible through the Configuration Utility called CookieSameSitePolicy under the WebHost category, this controls the "SameSite" setting applied when creating session cookies in the user's browser. By default this is Strict, the most secure setting, but it can be made less restrictive using this setting which may help with this issue, the valid values are:
| Value | Setting | Description |
|---|---|---|
| 0 | Strict | Prevents the cookie from being sent by the browser cross-site. |
| 1 | Lax | Provides a reasonable balance between security and usability. |
| 2 | None | Doesn't give any kind of protection. |
You can read more about the SameSite policy on The OWASP Foundation.
8.6.2 SAML Operating Mode set to Required, but a misconfiguration stopped it working and now login is impossible
You can change the Operating Mode back to Optional from the Configuration Utility by changing the OperatingMode setting under the SAML category to "1".
8.6.3 I get a certificate error when adding a Relying Trust in ADFS using the OVERLAPS metadata URL
If you get certificate errors when adding a Relying Party Trust from the OVERLAPS metadata, you may need to enable TLS 1.2 for the AD FS console.
You can read more about this here: link
For 32-bit applications that are running on 32-bit OSs and for 64-bit applications that are running on 64-bit OSs, update the following registry subkey values:
[HKEY_LOCAL_MACHINE\SOFTWARE\Microsoft\.NETFramework\v2.0.50727]
      "SystemDefaultTlsVersions" = dword:00000001
      "SchUseStrongCrypto" = dword:00000001

[HKEY_LOCAL_MACHINE\SOFTWARE\Microsoft\.NETFramework\v4.0.30319]
      "SystemDefaultTlsVersions" = dword:00000001
      "SchUseStrongCrypto" = dword:00000001
For 32-bit applications that are running on 64-bit OSs, update the following subkey values:
[HKEY_LOCAL_MACHINE\SOFTWARE\Wow6432Node\Microsoft\.NETFramework\v2.0.50727]
      "SystemDefaultTlsVersions" = dword:00000001
      "SchUseStrongCrypto" = dword:00000001

[HKEY_LOCAL_MACHINE\SOFTWARE\WOW6432Node\Microsoft\.NETFramework\v4.0.30319]
      "SystemDefaultTlsVersions" = dword:00000001
      "SchUseStrongCrypto" = dword:00000001
You may also need to make sure TLS 1.2 is enabled, see here for more information
[HKEY_LOCAL_MACHINE\SYSTEM\CurrentControlSet\Control\SecurityProviders\SCHANNEL\Protocols\TLS 1.2\Server]
    "Enabled"=dword:00000001

[HKEY_LOCAL_MACHINE\SYSTEM\CurrentControlSet\Control\SecurityProviders\SCHANNEL\Protocols\TLS 1.2\Server]
    "DisabledByDefault"=dword:00000000

[HKEY_LOCAL_MACHINE\SYSTEM\CurrentControlSet\Control\SecurityProviders\SCHANNEL\Protocols\TLS 1.2\Client]
    "Enabled"=dword:00000001

[HKEY_LOCAL_MACHINE\SYSTEM\CurrentControlSet\Control\SecurityProviders\SCHANNEL\Protocols\TLS 1.2\Client]
    "DisabledByDefault"=dword:00000000
8.6.4 My users are configured with a UPN different from our domain and cannot login
This is because the Claims Issuance Policy is returning the user's email address as the NameID, and OVERLAPS uses this information to talk to the correct domain to check the account's status and properties, but as the domain doesn't actually exist, it fails.
To get around this, in a single-domain environment you can instead configure the Claims Issuance Policy to send the SAM Account Name as the NameID instead. As this attribute doesn't include domain information, OVERLAPS will fall back on its default domain to verify the user information instead.