 Int64 Software Ltd

Creating a Self-Signed SSL Certificate for your Intranet Services
A guide on how to create a self-signed SSL/TLS certificate for encrypting client connections to intranet services (such as OVERLAPS).
Introduction
Many intranet services like OVERLAPS make use of login forms allow users to connect to the service. By default, this information is sent unencrypted across your network and is subject to be hijacked along the way, so it is strongly recommended that you allow the connection to be encrypted by installing a SSL/TLS certificate.
Depending on your setup, you may want to either purchase a new SSL/TLS certificate from a Trusted Authority or generate one from your own root certificate.
However, if the service is limited to your intranet, or if you’re just running a trial and don’t need third party trust, you can instead create your own “Self Signed” certificate to achieve the same results.
In this article, we’ll explain how you can quickly and easily do this using nothing but free tools.
What you need
For this guide you will need:
In this guide we will be using the certificate to secure our OVERLAPS product, which provides a web-based user interface for the Local Administrator passwords managed by Microsoft LAPS. To follow those parts of the guide, you will also need:
- Microsoft LAPS
- OVERLAPS (trial or full version)
A Quick Foreword on Public Key Encryption
SSL uses a system called Public Key Infrastructure (PKI) to create trust between a client and server. It doesn’t use this to encrypt any data directly, but instead uses it to identify that the server is who it says it is, and that a secure connection can be enabled to it.
The way this works is that the server has a secret Private Key, which is a cryptographically random list of numbers and a Public Key which is generated from the private key.
The public key can be distributed publicly (hence the name), and allows the client to identify the server can be trusted. This typically works by having the certificate generated by a common trusted authority (such as Comodo SSL, or Thawte SSL).
Once the server is identified and trusted, the public key can then be used to digitally sign or encrypt a message intended for the server only. This message can then be verified or decrypted only using the corresponding private key. In SSL, this is used to send an encrypted copy of the client’s own Public Key to the server, allowing two-way encrypted traffic to proceed.
Private Key Security
Remember that your private key is a secret, and even Self-Signed private keys should be guarded carefully. Failure to do so could allow an attacker to impersonate your server or read encrypted traffic from your clients.
Generating your Private and Public Keys
Before we do anything else we want to create a configuration file for OpenSSL. This is the easiest way to set all of the correct parameters and make it easier to tweak or repeat this process when needed (and can help in your internal documentation as well). Below is a good starting config file for you to copy & paste. Pay attention to the section marked “CHANGE THESE VALUES FOR YOUR SETUP” which you will need to change to for your setup.
# OpenSSL configuration file for creating a CSR for a
# server certificate

#  --- CHANGE THESE VALUES FOR YOUR SETUP  ---

# Your company name
ORGNAME = My Company Ltd
# Your two-letter country code
COUNTRY = GB
# The DNS hostname of your OVERLAPS server
CN = overlaps
# The fully qualified domain name of your OVERLAPS server
FQDN = overlaps.mdomain.local
# The IP address of your OVERLAPS server
IPADDR = 192.168.1.108

# --- NO MODIFICATIONS REQUIRED BELOW ---
[ req ]
default_bits = 4096
default_md = sha256
prompt = no
encrypt_key = yes
distinguished_name = dn
req_extensions = SAN

[ dn ]
C = $COUNTRY
O = $ORGNAME
CN = $CN

[ SAN ]
subjectAltName = DNS:$FQDN,IP:$IPADDR
The sections you need to change are:
- ORGNAME – Your company name
- COUNTRY – Your two character country code (e.g. US, GB, AU, CA, etc.)
- CN – The Common Name of your OVERLAPS server (e.g. overlapsvr)
- FQDN – The fully qualified domain name of your OVERLAPS server (e.g. overlapssvr.mydomain.org)
- IPADDR – The IP address of your OVERLAPS server
The other settings should be left as they are unless you need to change them. For more information on the configuration file, see https://www.openssl.org/docs/man1.0.2/man1/openssl-req.html.
Once these settings have been changed, save the file in your working directory (where you will save your certificates). In this example, the file was saved as “config.cfg”.

Now open a command prompt and navigate to the folder where you want to save your new Private and Public key files.
Then call OpenSSL to create the key files using this command (note that in Windows openssl.exe is located in “C:\openssl\bin\” by default):
openssl.exe req -new -x509 -extensions SAN -keyout private.pem -out public.pem -config config.cfg -days 365Below is a breakdown of these values:
- req – Command for creating and processing certificates
- -new – Indicates that we want to create a new certificate request
- -x509 – Output a self-signed certificate (instead of the certificate request)
- -extensions SAN – Enables the Subject Alternative Name (SAN) extension
- -keyout private.pem – Filename to output the private key to
- -out public.pem – Filename to output the public key to
- -days 365 – How long the certificate should be valid for
You will then be prompted for a password to encrypt the file with (remember to make a note of this, you’ll need it later).

This will give you 2 .pem files which contain your base64 encoded private and public keys. However, OVERLAPS requires the files in the PKCS#12 (.pfx) format, and your public key will need to be a Distinguished Encoding Rules (.der) file, so we have to convert them first.
Converting your private key to PKCS#12

To convert your private key .pem file to a .pfx PCKS#12 certificate file, use the OpenSSL command:
openssl.exe pkcs12 -export -aes256 -in public.pem -inkey private.pem -out certificate.pfxAgain, breaking this command down bit-by-bit:
- pkcs12 – Specifies that we want to work with PKCS12 files (.pfx)
- -export – Export a PKCS12 file (instead of parsing an existing file)
- -aes256 – Encrypt the private key using the AES256 algorithm
- -in public.pem – Loads your public key .pem file generated in the last step
- -inkey private.pem – Also loads your private key .pem file
- -out certificate.pfx – The filename to export your PKCS#12 certificate to
You will be prompted for the password for your private key (set in the previous section) and a new password for the exported PKCS#12 certificate file (which can be the same if you wish).
Converting your Public Key to DER

Now you can convert your public key to a DER file using the command:
openssl.exe x509 -outform der -in public.pem -out public.derWhere:
- x509 – Using the X509 certificate utility
- -outform der – Output a DER file
- -in public.pem – Specify your generated public key
- -out public.der – The output filename
Binding your Private Key to the OVERLAPS Server
Now that you have a private key (*.pfx) and a public key (*.cer), you’re ready to move to the OVERLAPS server.
Copy your private key to the server for the next step.
As of version 2.0, the OVERLAPS configuration tool (olconfig) makes it easier than ever to bind your certificate to the OVERLAPS service.

The olconfig command line for this is:
olconfig.exe https /certfile <path_to_pfx> /password <pfx_password> /hostname <dns_name_of_overlaps_server>and/or (if binding to an IP address):
olconfig.exe https /certfile <path_to_pfx> /password <pfx_password> /ipaddress <ip_of_overlaps_server>If this is successful, you should see the message “SSL Certificate successfully bound.”
You can now enable HTTPS through the OVERLAPS web interface, or by using the command “olconfig.exe https /enable /restart”.
Deploying your Public Key to Clients
Now that your server is hosting content using your self-signed private key, you now need to distribute the public key to any client devices which will be connecting to the service. This allows them to verify that the server’s private key is trusted, and that a secure channel can be made between them.
Warning: Never deploy your Private Key (.pfx) to clients!
The simplest way to distribute your public key is to use a Group Policy.
Either create a new policy or edit an existing one. Navigate to Computer Configuration -> Policies -> Windows Settings -> Security Settings -> Public Key Policies -> Trusted Root Certification Authorities.
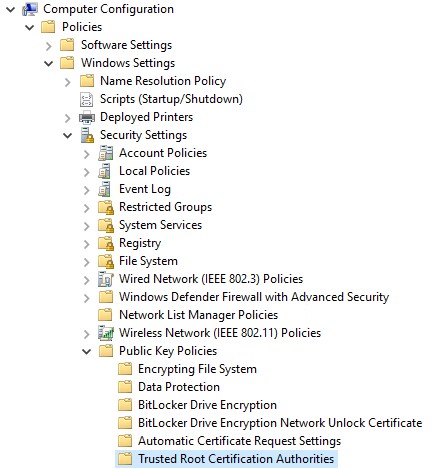
Right click this and choose “Import…“, and when prompted browse to and select your public key file (.der). Note that by default the browse window will only show .cer and .crt files, change the filter to “All files (*.*)” to see your DER file – it should still import without any problems.

Leave all of the other options as their default and click through the interface until you get the message that the import was successful.
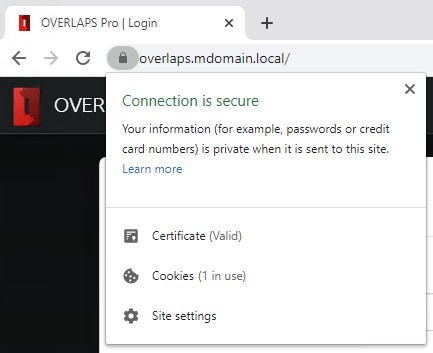
Once your clients have run a Group Policy update, they should now be able to connect to your OVERLAPS service over HTTPS.
What to do if this doesn’t work
During the many tests that were carried out when preparing for this guide, the number one cause of problems was getting the CN, FQDN and IPADDR properties right in the configuration file for OpenSSL.
If you get as far as attempting to connect to your server over HTTPS, but are getting errors such as “ERR_CERT_COMMON_NAME_INVALID”, the you will need to go back to the config file and check that these values are correct.
Remember that the CN should be the DNS hostname of your server (e.g. “myoverlaps“), and the FQDN should be the Fully Qualified Domain Name of the server (with domain information, e.g. “myoverlaps.domainname.com“).
Like the article? Share with your friends: