 Int64 Software Ltd

Self-Service Users in OVERLAPS for Microsoft LAPS
Introduction
Now entering its 5th year of service, OVERLAPS for Microsoft’s Local Administrator Password Solution (LAPS) has established itself and a must-have security tool for IT and Service Desk technicians the world over, providing a much needed quick-and-easy interface for LAPS managed environments.
While it may appear that the primary focus for OVERLAPS is to be a tool solely for the use of the IT professionals however, today we’re going to take a look at another aspect of its work: Self-Service, and how you can use it to empower everyone in your company and devolve responsibility with the aim of reducing the number of support calls you receive.
The Scenario
To best explain the setup and benefits of a Self-Service environment, let’s put it in the context of a fictitious company: The Imaginative Made Up Corporation (or IMUC for short). IMUC has around 500 general staff including a small IT department of 5.
One particular department in IMUC, the External Relations (ER) team, are frequently having to install, remove and debug third-party applications on their computers. As Administrator accounts are restricted by policy in the IMUC organisation, the ER team have to raise a ticket for the IT Service Desk whenever one of these changes is needed, and requires one of the 5 IT team members to learn about and either visit or remotely install the software for them. This is causing a significant drain on the IT team’s resources.
It has been decided that the ER team members are sufficiently experienced and knowledgable that they can be trusted to carry out the work themselves, but the corporation’s IT Security Policy must be adhered to, particularly in the restriction of Administrator accounts. To add to this, IT support still want final say on the changes that the ER team are going to make.
In order to achieve these project requirements, the IT team will leverage the features already present in OVERLAPS to make the ER team members Self-Service users.
To summarise, the requirement brief is:
- Users in the External Relations Team are to be granted the means to make Local Administrator-level changes to their own computers only.
- Access for the above should be granted by an IT Support team member on a case-by-case basis on receipt of sufficient justification.
- Access should be limited to a maximum of 1 hour windows, after which Local Administrator access should be withdrawn again.
Initial Setup
Active Directory Users and Groups
The ER team’s users are all contained in the same Organisational Unit in Active Directory:
OU=ExternalRelations,OU=OffSiteEnterprises,OU=Users,OU=UsersAndGroups,DC=intdev,DC=local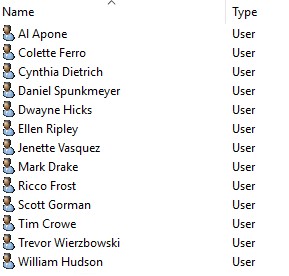
All members of the team are in a Global Security Group called “ERTeam-Members” which we’ll use later as an easier way to add and configure them in OVERLAPS. This will also make adding or removing users as people join or leave the team easier in the future.

Microsoft LAPS Group Policy Settings
LAPS is already installed and configured in the environment, and is running on all of the company’s desktop computers and laptops. Its Password Complexity, Length and Age have all been set according to the corporation’s IT Security Policy.
Additionally, in order to improve LAPS password expiry times, the Group Policy Refresh Interval for Computers, which is 90 minutes by default, has been reduced to run every 30 minutes.
The logic behind this is because LAPS is run on a client device during the Group Policy Refresh cycle. For normal operation the default is fine, but if you are planning on expiring passwords early a lot (and would like it done in a timely fashion) then it may be a good idea to increase the frequency at which the GP Refresh runs.
For reference, the policy for controlling the Group Policy Refresh Interval can be found under:
Computer Configuration > Administrative Templates > System > Group Policy > Set Group Policy refresh interval for computersComputers
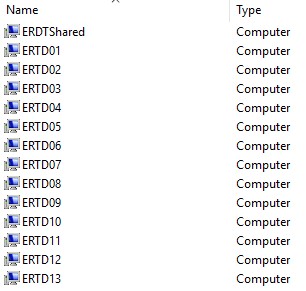
The External Relations office has one desktop computer for each team member, plus a shared computer which is used for occasions when multiple team members need to work on a single instance of a software product at the same time and for hosting the office’s ageing inkjet printer which is still hanging on despite the IT departments best attempts to “retire” it (there’s always one!).
Matching Computers to Users
One of the most difficult aspects of a scenario like this is the question of how to correctly match one or more computers to a user. You can pull information from System Center or a Hardware Inventory system, if the data in them can be guaranteed to be accurate, or you can maintain manual lists. I’ve yet to find the perfect solution, but for this example we will be using a simple CSV file on a shared drive which can be easily read and updated by the IT team.
OVERLAPS has three ways to import this information:
- Adding and Updating the computers manually though the Self-Service user configuration window (See: https://int64software.com/overlaps/docs/en-gb/3.1.0.0/config-users-and-groups/#managing-self-service)
- Importing users and computers in bulk using the Self Service Import Tool (See: https://int64software.com/overlaps/docs/en-gb/3.1.0.0/tools-self-service-import/). Note that in the current version this tool is only able to import new user <—> computer associations, not remove or update existing ones.
- Utilising Active Directory’s “Managed By” attribute on the computer objects themselves.
The last option here is probably the easiest as it presents a dynamic solution which can be easily updated either manually or automatically from any of the above sources and some simple PowerShell scripting. For this reason, this is the method that we will use in this guide, but if you’d like to read more about the other options please check the links above.
Side Note
One important thing to be aware of, however, is that if you use either option 1 or 2 above to assign computers to users, then that computer’s full distinguished name is used to identify it uniquely in the environment. This means that if a computer is reassigned and moved to another Organisational Unit, the user it was assigned to will no longer be able to access any Local Administrator passwords for that device through OVERLAPS. By contrast in option 3, if they aren’t removed from the Managed By property when the computer is moved/reassigned then they will not lose this permission. In terms of least-privilege I would say that the former situation is preferable, but that decision will depend on a case-by-case basis.
I have prepared a simple CSV file which matches each user to their own desktop computer, this will be used to update the Managed By attribute on each computer in PowerShell.
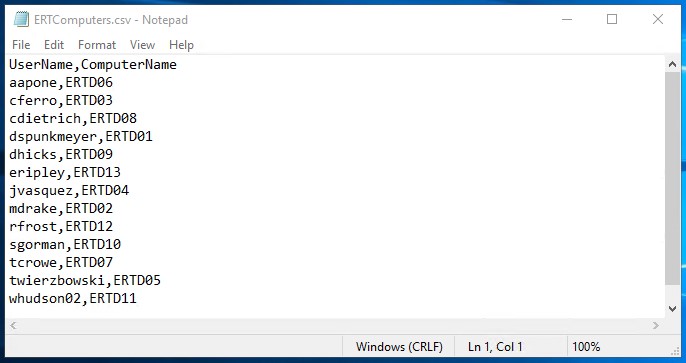
Importing this into PowerShell and using the information to update computer objects couldn’t be simpler:
Import-Csv -Path "C:\UserComputers\ERTComputers.csv" | ForEach-Object {
    Set-ADComputer -Identity $_.ComputerName -ManagedBy $_.UserName
}
This code uses the “Import-Csv” command to open the CSV file “C:\UserComputers\ERTComputers.csv” as shown above, then it iterates through each line and calls the “Set-ADComputer” command to find each computer given by “-Identity” and setting the “-ManagedBy” property to the username, each value identified by the heading text we gave it in the CSV ($_.ComputerName and $_.UserName).
Note that if there is any ambiguity in your username or hostnames then you may want to provide the full Distinguished Names for both, but in this example scenario this isn’t necessary.
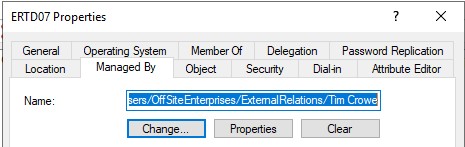
After running this, we can open the computers in Active Directory Users and Computers, switch to the “Managed By” tab and see that the correct users are now listed.
OVERLAPS Configuration
Email Setup
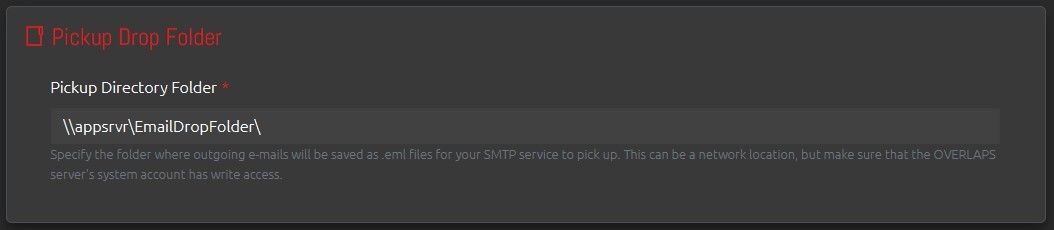
Config > Email SystemOVERLAPS email settings will vary depending on your environment, but in this test scenario the domain has a network share Drop Folder which MS Exchange is configured to pick up properly formatted email files (in this case .eml files) and process them.
In order to make use of the Authorisation Request system in OVERLAPS, the email system must be configured so that nominated Authorisers can receive notifications that there are requests pending, and so that the Requester can be notified when an Authoriser responds.
Site Settings
Config > Website SettingsFor this example, all Authorisation Request settings under Config > Security > Authorisation Requests will be left as their default.
The only change we will be making is under Config > Password Reset Options > Automatic Password Reset where we will be changing the “Self-Service – Automatic Password Expiry (minutes)” setting to 60 minutes as per the brief.
The effect of setting this to a non-zero value is that after a user (in this case a Self-Service user) is authorised and actually views the Local Administrator password for their computer, this will immediately set the AD attribute “ms-Mcs-AdmPwdExpirationTime” for that password to expire this number of minutes in the future. So setting this to 60 means that in one hour the password will be considered expired and the next time LAPS runs it will randomly reset the it.
This is a great way of limiting the length of time that a user has access to a Local Administrator password, but it must be combined with an appropriate setting for the Group Policy Refresh Interval mentioned previously so that LAPS doesn’t run too long after the expiry.
We are looking at combining this with the Computer Management Tools in OVERLAPS so that in the future you may be able to have it trigger a scheduled Group Policy update after the expiry time, speeding up the process and removing the reliance on GP Refresh Intervals however.
Users and Groups for Self-Service
Config > Users and GroupsRather than adding each ER team member individually, since they are already members of their own team security group, I will just add the team to OVERLAPS using all of the default options.

Using the drop-down accessed by clicking on the group’s name we can now go to the Self Service settings for the group.
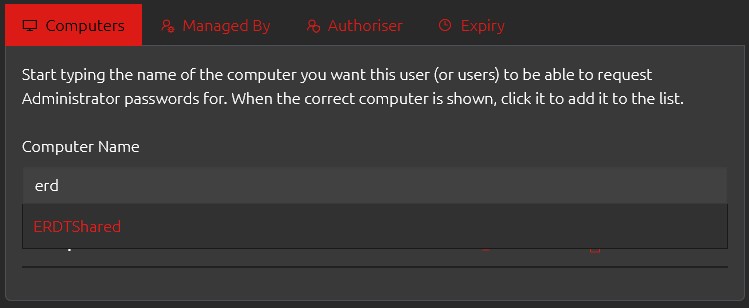
The first tab is the “Computers” tab, which is used for setting up individual users’ access to specific computers manually, as we’re using the “Managed By” AD attribute for each user’s own computer this may not be necessarily required at this point depending on your own setup.
However, we do have that one shared computer which every member of the ER team should have Self-Service access to. We can do this by adding it to the group, and thereby granting access to each member of that group.
Once the shared computer has been added, we need to check the box to say that an Authorisation Request is needed to access the Local Administrator password for this device.

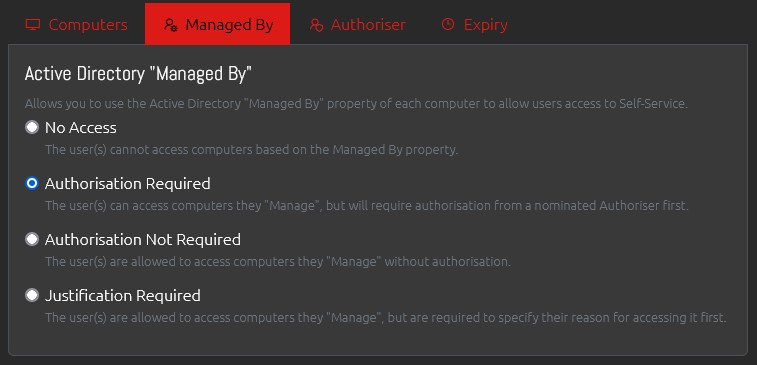
Now moving on to the “Managed By” tab we can specify that we want the group members to also be able to access the Local Administrator password of any computer that they are listed as the manager of in AD, but, as with the shared computer, that they must first submit an Authorisation Request in order to do so.
If you want to specify a user or group who will act as the Nominated Authorisers for these Self-Service Authorisation Requests you can do so in the “Authoriser” tab. The user in question must already have been added to OVERLAPS in order to be able to select them, but they don’t require any other particular permissions. Alternatively, and as we will show in this example, we have already configured Authorisers for the Organisation Unit containing the ER Team’s computers, so we will leave the Authoriser tab as the default.
Finally, if you only want this Self-Service setup to be temporary, you can set an expiration date in the “Expiry” tab. After this date, the user will be removed from Self-Service and will not have any access after that.
Once saved, you will see the “Special Settings” has updated to show that the group is now Self-Service:

Nominated Authorisers
Config > PermissionsAs mentioned above, you can specify Authorisers on a per-Self-Service setup if needed, but we are going to look at how we have it setup in this example: with per-OU Authorisers.

Here we have an admin in the IT department who is set to be an Authoriser (for Self Service requests only) on the entire Clients OU and its children. This means if any Self Service Authorisation Request are raised, this user (along with any others that may be listed at or below this level) will get an email notification that there are pending requests, and can either Authorise or Deny them.
Completed Workflow and User Experience
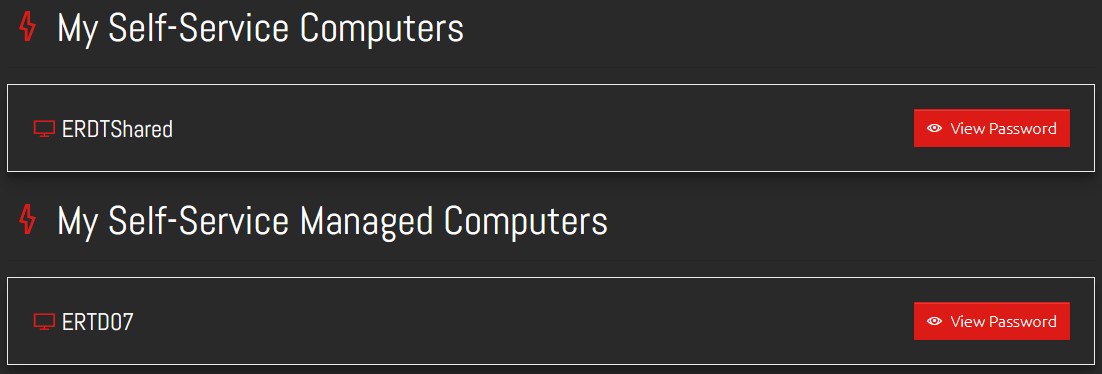
Now that we have completed this very basic Self-Service setup, the users can now login and will see their computer and the shared computer.
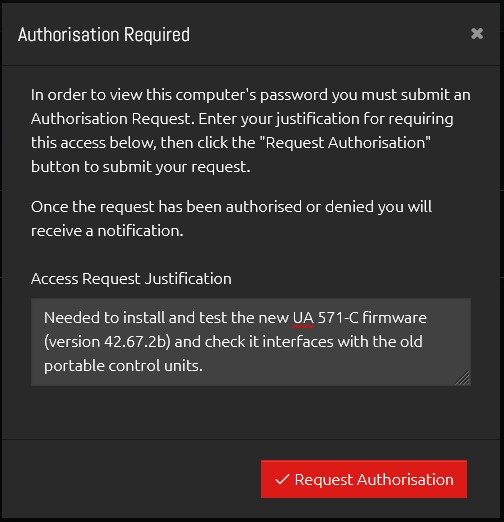
As the users are required to submit an Authorisation Request before gaining access to the passwords, when clicking the “View Password” button they will be presented with a window asking them for their justification.
Once submitted, an email will go to all relevant Authorisers to notify them that they have a pending request which they can Authorise or Deny.
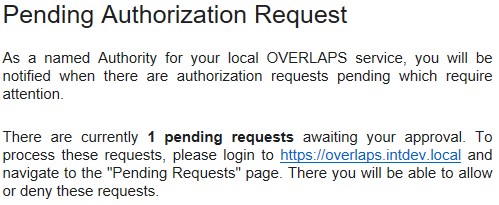
Note that the email may be in the summarised form as shown in this screenshot, or itemised (showing each request with its details) depending on your settings.
Within OVERLAPS the Authoriser can provide a response if needed and process the request.
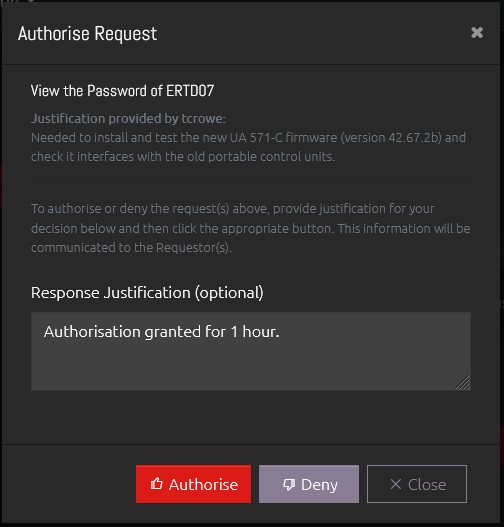
The Requester will receive their own notification email following this, and if the request is Authorised then they will now be able to access the password for the next hour.
Like the article? Share with your friends: