 Int64 Software Ltd
Installing and Configuring Microsoft LAPS: A Complete Guide – Part 2
Introduction
In our last article we showed how carry out a fresh install and configuration Microsoft’s Local Administrator Password Solution (LAPS) in your Active Directory environment. If you haven’t read that already, start by following this link.
LAPS is an incredibly useful free tool provided by Microsoft to automatically manage the Local Administrator account password for your domain joined Windows computers, and is a security tool that any organisation with an Active Directory domain should have.
However, the client user interface it provides leave a lot to be desired as it only works on Windows computers and is very simple in design. So today we’re going to take that one step further by installing and configuring OVERLAPS.
OVERLAPS is a third party add-on for LAPS which provides a web interface, so you can now access LAPS managed passwords from any device, including mobile phones, while on the move.
This Guide
This guide will take you through the setup and configuration of OVERLAPS. However, it only contains a subset of the information available in the full Setup Guide which we recommend downloading (PDF available here) for the full and very latest information.
System Requirements
We’re going to be installing OVERLAPS on a Windows Server 2016 box with nothing else on it, but it can be installed on any Windows device after Server 2012 R2 or Windows 10.
OVERLAPS a really light-weight application, so we’ve just setup a single core, 512Mb RAM virtual machine in Hyper-V for this demonstration, and it really doesn’t need more than that.
In the real world, we’d probably recommend installing it on an existing host so you’re not paying for another Window licence. The only gotcha to watch out for is if another internet service is already using ports 80 or 443, but we’ll cover that later.
When it comes to actually using OVERLAPS, the web interface requires any modern web browser with JavaScript enabled.
Installation and Initial Configuration
Running the Bundle Installer

Double click the OVERLAPS installer to start the installation process.
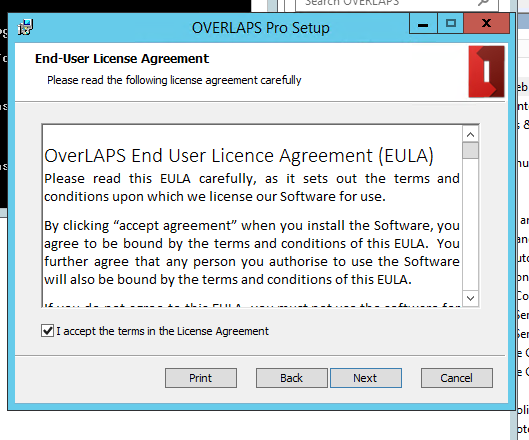
The End User Licence Agreement will display. There aren’t any surprises in there though, so once you’re happy check the “I accept…” box and click Next.
You may notice a command window popping up briefly. This is the database upgrade handler which is responsible for creating the database file if needed and, when installing version 2.0 for the first time, importing all of your configuration data into it.
Once the installation process has completed, you’ll be shown a success message.
If everything went to plan, you should now see the OVERLAPS service installed and running. You can check this by running the Services system tool (Start -> Run -> services.msc).

Configuring the Server Port
If you notice the service isn’t running, check the log file in the below folder for problems. The most common cause for failure is because another process is already serving HTTP content on port 80.
C:\ProgramData\Int64 Software Ltd\OVERLAPSIf this happens, or if you want to change the port for another reason, you can do so by editing the OVERLAPS configuration file (config.xml).
By default, the OVERLAPS is configured to use port 80 for unencrypted (HTTP) traffic and port 443 for encrypted (HTTPS) traffic. Note that HTTPS is not enabled by default as you first need to install a certificate either from a Certificate Authority, generated from your own root certificate, or using a Self-Signed certificate (https://int64software.com/blog/2020/04/20/creating-a-self-signed-ssl-certificate-for-your-intranet-services/).
The ports can be changed to any valid port number (1–65535), but remember to check a list of known ports (such as this handy one on Wikipedia, or this list of default ports used by Windows) to make sure you don’t conflict with anything.
Any changes to the configuration file require the OVERLAPS service to be restarted. You can do this by right clicking the service and selecting Restart (or just Start if the service is already stopped).
Installing your Licence File
If you have purchased an OVERLAPS licence then you will be able to generate and download a licence file from your Downloads section on our website. This file will need to be placed in the OVERLAPS data folder (see below) before it will work.
C:\ProgramData\Int64 Software Ltd\OVERLAPS\Once the file is in place, restart the OVERLAPS service. If it worked correctly, you will get the login page when going to the server’s IP address/hostname from a web browser. If you receive a licence error, try downloading the file again.
The OLCONFIG.EXE Tool (Replaces LAPSUSER.EXE)
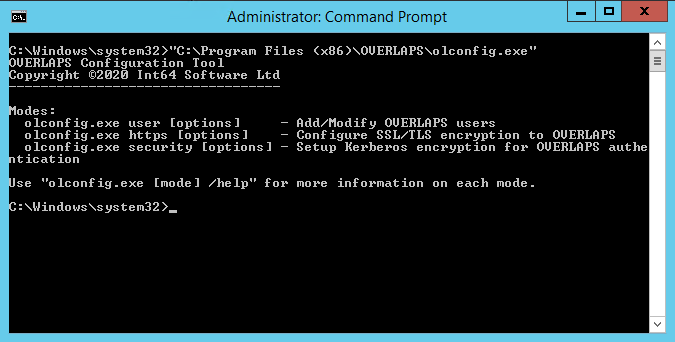
As of version 2.0, OVERLAPS replaced the legacy lapsuser configuration tool with the more comprehensive olconfig command line utility.
This tool still allows you to manage users, but also adds functionality for configuring Kerberos and installing SSL/TLS certificates.
Command line help can be viewed for each function using the following commands:
olconfig.exe user /help
olconfig.exe https /help
olconfig.exe security /help
Configuring Kerberos for Added Login Security
By default, the OVERLAPS web server will use the NT LAN Manager (NTLM) to handle Integrated Authentication requests (as opposed to the form login method). While this is fine for most cases, NTLM has been shown to be vulnerable to certain Man-In-The-Middle attacks, so it is recommended that you configure it to use Kerberos instead.
To configure Kerberos, you must define a Service Principal Name (SPN) for the server. You can do this in one of two ways: automatically using the “olconfig.exe” command line tool included with OVERLAPS, or manually using the “setspn.exe” tool provided by Windows.
Configuring Kerberos using olconfig.exe
Enabling Kerberos support using the olconfig.exe tool can be achieved very simply with one of the following commands depending on whether you are using HTTP, HTTPS or both HTTP and HTTPS (recommended).
olconfig.exe security /enablekrb http
olconfig.exe security /enablekrb https
olconfig.exe security /enablekrb both
To check the current Kerberos status, you can use the command line:
olconfig.exe security /krbstatusConfiguring Kerberos manually
Alternatively, to register an SPN manually, use the command line:
Setspn.exe –a HTTP(S)/<servername> <machineaccount>$Where “<servername>” is the name of the server OVERLAPS is installed on how a user would connect to it, and “<machineaccount>$” is the system account name of that device.
So, for example, if our server was called “overlaps” (accessed as “http://overlaps”), and we wanted to configure both HTTP and HTTPS to support Kerberos, we’d use the command lines:
SetSPN –a HTTP/OVERLAPS OVERLAPS$
SetSPN –a HTTPS/OVERLAPS OVERLAPS$
If, however, the server is accessed as “http://overlaps.contoso.com”, then we’d use:
Setspn.exe –a HTTP/OVERLAPS.CONTOSO.COM OVERLAPS$For more information on configuring Service Principal Names, please refer to Microsoft’s documentation on the subject.
Encrypted Web Traffic with HTTPS
To further increase security to OVERLAPS, we recommend that you install an SSL certificate so that your client <-> server traffic is encrypted.
You’ll need to purchase or generate a certificate for this purpose (see here for a guide on creating a Self-Signed certificate).
Configuring HTTPS using olconfig.exe
With your .pfx private key certificate in an accessible location, use the following command to bind it to OVERLAPS:
olconfig.exe https /certfile <filename> [/password <password>]Configuring HTTPS manually
1. Run mmc.exe
2. Go to File -> Add/Remove Snap-in
3. Select “Certificates” and click Add
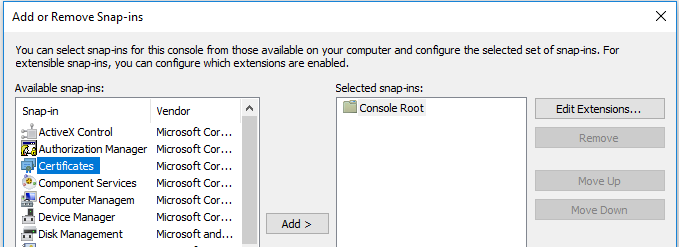
4. Select “Computer account” when prompted
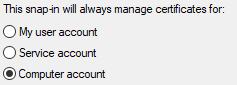
5. Select “Local computer: (the computer this console is running on)”
6. Click Finish
7. Click OK to close the snap-in dialog
8. Navigate to Certificates -> Personal
9. Right click and select All Tasks -> Import
10. When prompted for a file to import, click Browse
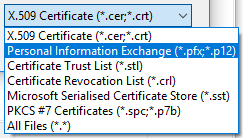
11. Next to filename, where it says “X.509 Certificate (*.cer, *.crt)”, change this to “Personal Information Exchange (*.pfx, *.p12)”
12. Select your certificate’s private key file
13. When prompted, enter the certificate’s password and check the box to “Mark this key as exportable”
14. Follow the rest of the dialog to complete the import.
15. Once imported, right click the certificate and click “Open”
16. Navigate to the Details tab, and scroll down to “Thumbprint”, copy this value for use in the next step.
Linking (binding) your Certificate to OVERLAPS
To link your certificate to OVERLAPS you need to use the “netsh” command from the command prompt.
The command to add the certificate is:
Netsh http add sslcert hostnameport=<servername>:443 certhash=<thumbprint of your certificate> appid={7c492133–379e-4918–82c3–1d8d2f9bee3a}Where “<servername>” is the fully qualified name of your OVERLAPS server as a client would access it (e.g. overlaps.contoso.com), and “<thumbprint of your certificate>” is the value you copied at step 16 of the last section.
Be careful to make sure you copy the “appid” exactly as this identifies the OVERLAPS executable is what you want to attach the certificate to.
You should receive the message “SSL Certificate successfully added”. If, however, you receive the message “A specified logon session does not exist”, then the certificate is probably not installed in the correct store, check again that it is in the Personal folder of the Current Computer store (I’ve made this mistake more times that I care to count!)
Once that is complete, you can now enable HTTP in the OVERLAPS configuration file.

Remembering to restart the OVERLAPS service to register the change.
After testing that this has worked, it is recommended that you then disable unencrypted HTTP traffic, which can also be done through the configuration file.
Adding the First Administrators
Before you can login for the first time, you must first add yourself as an Administrator user. You can use the “olconfig.exe” tool to do this. All subsequent users and groups can be added from within OVERLAPS itself.

To add yourself, use the command line:
olconfig.exe user <myusername> /add /adminIf everything works then you should receive a success message.

Active Directory
Multiple Domain Forest Support
From version 1.3.4 OVERLAPS now supports multiple domain environments with a properly configured trust relationship.
Navigation
By default, when populating Organizational Units, OVERLAPS will look to the root domain of the forest and from there discover any accessible child domains. However this can be modified from the configuration file by changing the “MultipleDomainPreference” value to the following:
“RootFirst” (Default)
Seeks the root domain in the current Forest and then attempts to include child domains.
“MemberFirst”
Selects the domain that the OVERLAPS server is a member of first, and then attempts to include any other domains in the current Forest (including the root if it is not the same).
“SingleDomainOnly”
Limits OVERLAPS to the domain that its server is in only. No attempt will be made to attempt to read any other domains in the Forest.
Authentication
In this latter mode, user authentication is also limited to the current domain. Otherwise in a multi-domain environment, users will be prompted for their domain prior to logging in (or have to supply it in the form “domain\username” in the case of Windows Integrated Authentication).
Universal Groups are supported for user login, as are per-domain groups. When adding a user or group in a multi-domain environment, you will be prompted for the domain that the user belongs to.
Note that currently, the “lapsuser.exe” program only supports local domain users.
Permissions
In order to view and (in the case of OVERLAPS Pro) modify the Microsoft LAPS managed Local Administrator passwords, OVERLAPS requires the following Active Directory Organizational Unit permissions to the containers in which the managed computers reside:
- Read ms-McsAdmPwd
- Read ms-Mcs-AdmPwdExpirationTime
- Write ms-Mcs-AdmPwdExpirationTime
Configuring just these permissions correctly can lead to unexpected behaviour, so it is recommended to make use of the PowerShell scripts that come with Microsoft LAPS to set them.
As OVERLAPS runs as Local System on the host server, you will need the server’s computer account name to proceed. This should be the name of the server followed by a dollar sign ($), so if the server is called “myoverlaps” for example, the computer account name would be “myoverlaps$”.
- Launch PowerShell using an account which has the necessary Active Directory modification permissions.
- Load the LAPS module by typing:
Import-Module AdmPwd.PS - Grant read permission to the Local Administrator password property with the command:
Set-AdmPwdReadPasswordPermission -OrgUnit -AllowedPrincipals - If using OVERLAPS Pro, also grant write permission to that you can reset the password expiry time, forcing a reset when LAPS next runs on the client:
Set-AdmPwdResetPasswordPermission -OrgUnit -AllowedPrincipals - Restart the OVERLAPS service to make sure it picks up the new permissions.
If everything went to plan, OVERLAPS will now be able to view and, in Professional, trigger a reset of the Local Administrator passwords.
Multi-Domain Permissions
In multi-domain environments, these permissions may need to be manually applied to each domain.
Additional Configuration Options
The Configuration File
As mentioned previously, OVERLAPS stored all of its configuration options in an XML file at:
C:\ProgramData\Int64 Software Ltd\OVERLAPS\config.xml
You must have Administrator rights on the server to modify this file and any changes require the OVERLAPS service to be restarted.
Specific Settings
Most of the settings in the configuration file can be modified easily from within the “Config” page of OVERLAPS. However, some settings are considered “internal” and cannot be changed from within OVERLAPS, or there may occasions when being able to modify values manually could be advantageous. For this reason, some of the key values are shown below.
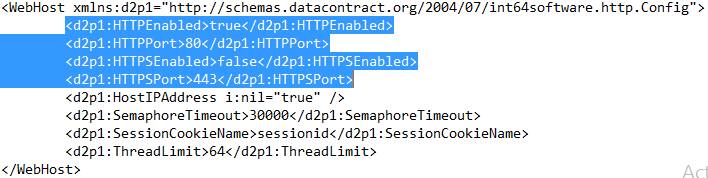
HTTPEnabled/HTTPSEnabled
If “true”, enables the respective type of traffic (unencrypted HTTP or encrypted HTTPS).
HTTPPort/HTTPSPort
The port that will be opened for HTTP or HTTPS traffic respectively (default 80 and 443).
ThreadLimit
The maximum number of concurrent requests that the web host can handle. If you have a large user base and start noticing the website becoming sluggish, then you may wish to increase this value.
MaxInputStreamSizeBytes and MaxInputVarsPerRequest
These values control the limitations on data posted to the server during a web request. They are designed to limit the thread of a denial of service attack or flooding the server. The only time these values may need to be modified is if you operate a particularly large number of Organizational Units in your domain.
DateFormat
While a small selection of standard formats are provided for selection from the Config page, this allows you to specify a custom date format using standard date format characters (see https://docs.microsoft.com/en-us/dotnet/standard/base-types/standard-date-and-time-format-strings). Do not use this to specify time format values.
LDAPPort
Change this if you need OVERLAPS to connect to Active Directory using a different LDAP port.
EnforceWIA
If set to “true”, the user login page will be disabled and OVERLAPS will only accept Windows Integrated Authentication logins.
UpdateCheckFrequencyDays
How frequently (in days) OVERLAPS should check for program updates. Updates are not installed automatically, but this is just used to put a flag in the page footer to notify you that an update is available. Set this to “0” to disable update checks.
User Interface

The main menu provides access to all of OVERLAPS pages. The items available depend on the permissions of the currently logged in user.
Browser
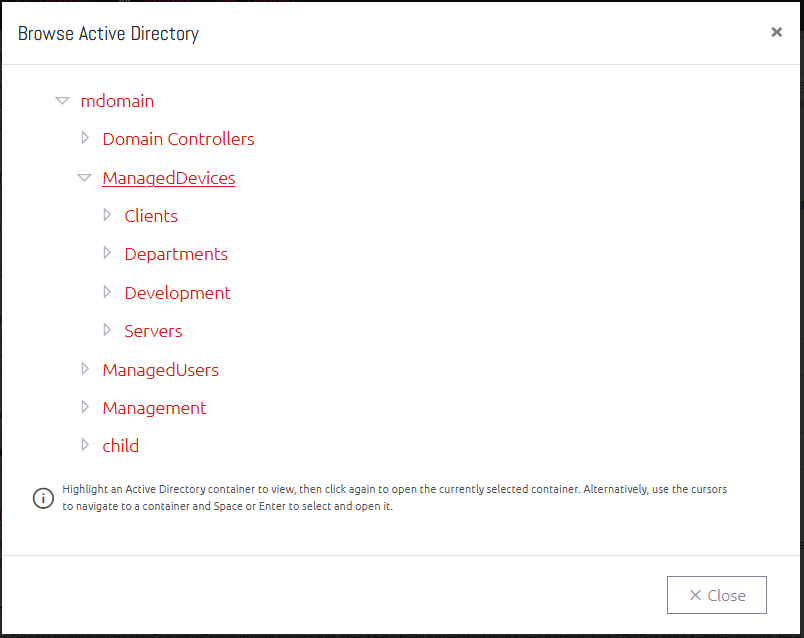
The Active Directory Browser window allows you to quickly navigate your Active Directory structure for a particular Organizational Unit. Click a container to select it, then click again to open to that page.
Duplicate Containers in the Browser
Some users may experience duplicate containers showing in their browser like the example below.
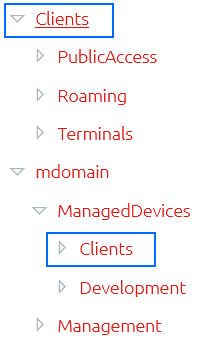
This occurs when a user is granted permissions to containers through more than one combination of groups or direct (explicit) membership. In this example, the user is explicitly defined in the OVERLAPS user list and is granted full access to the “mdomain” domain. However, they are also a member of a Security Group which was added to OVERLAPS and given permission to the “Clients” Organizational Unit. Because of the way that OVERLAPS now dynamically populates this tree, they are therefore seeing both entry points into the domain.
This is not anything to be concerned about, and it should not impact on the user’s experience. However, if you wish to avoid this, try to limit the number groups that users are a member of and keep your permissions simple.
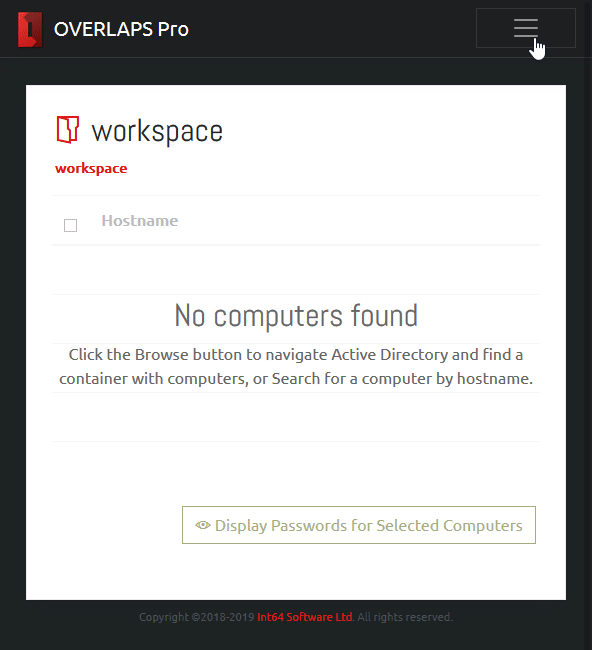
Computer List
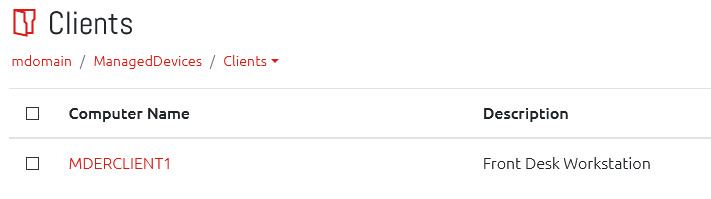
When a valid container with computers is selected, you will see the computers in a list.
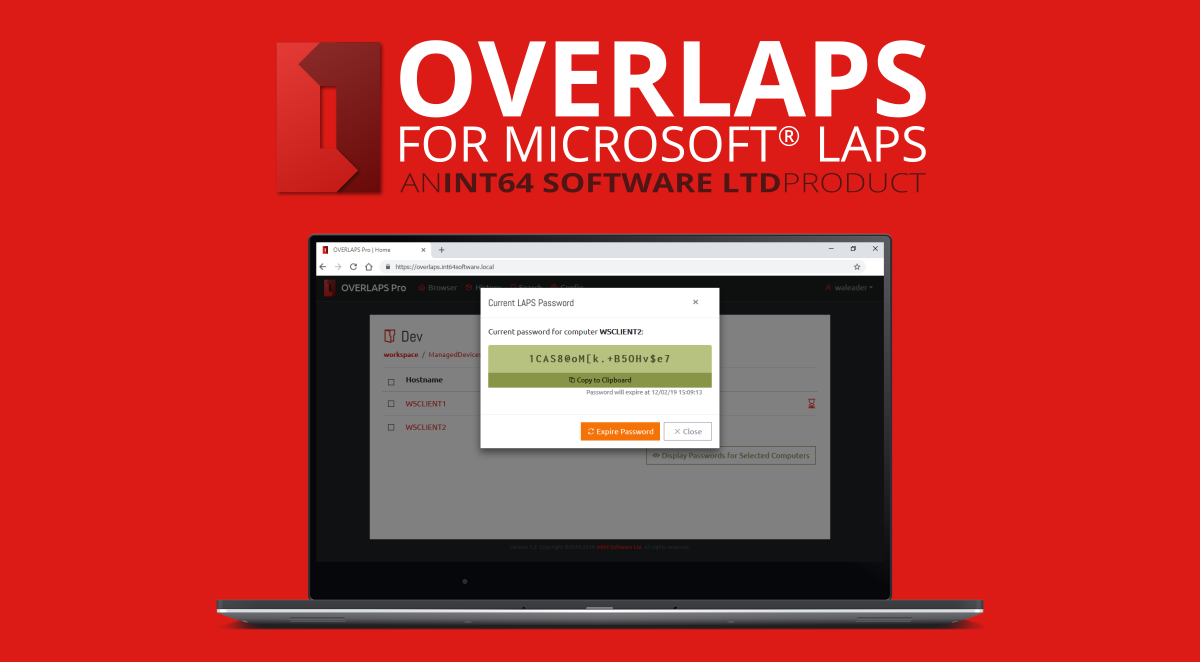
Viewing a Computer’s Local Administrator Password
From here you can click on a computer to display its LAPS managed Local Administrator password.
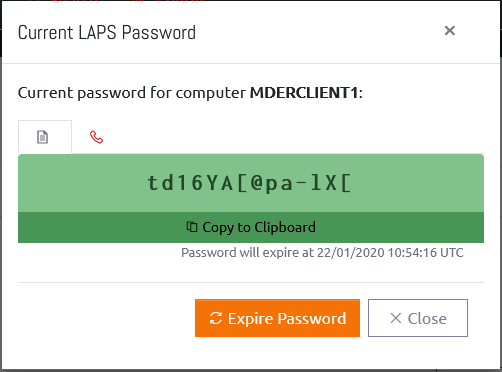
From this window you can click the “Copy to Clipboard” button to have the password copied to your system clipboard.
You can also click “Expire Password” to trigger a password reset on the computer. Note that this will happen when the computer next performs a Group Policy update.
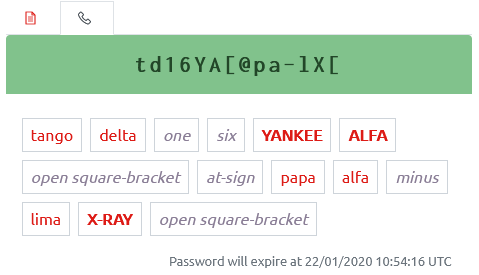
Phonetic Alphabet View
Clicking the phone tab button switches the view to the Phonetic Alphabet view. There are several of these available (selected the Config page), this example shows the full NATO version.
Batch Password Retrieval
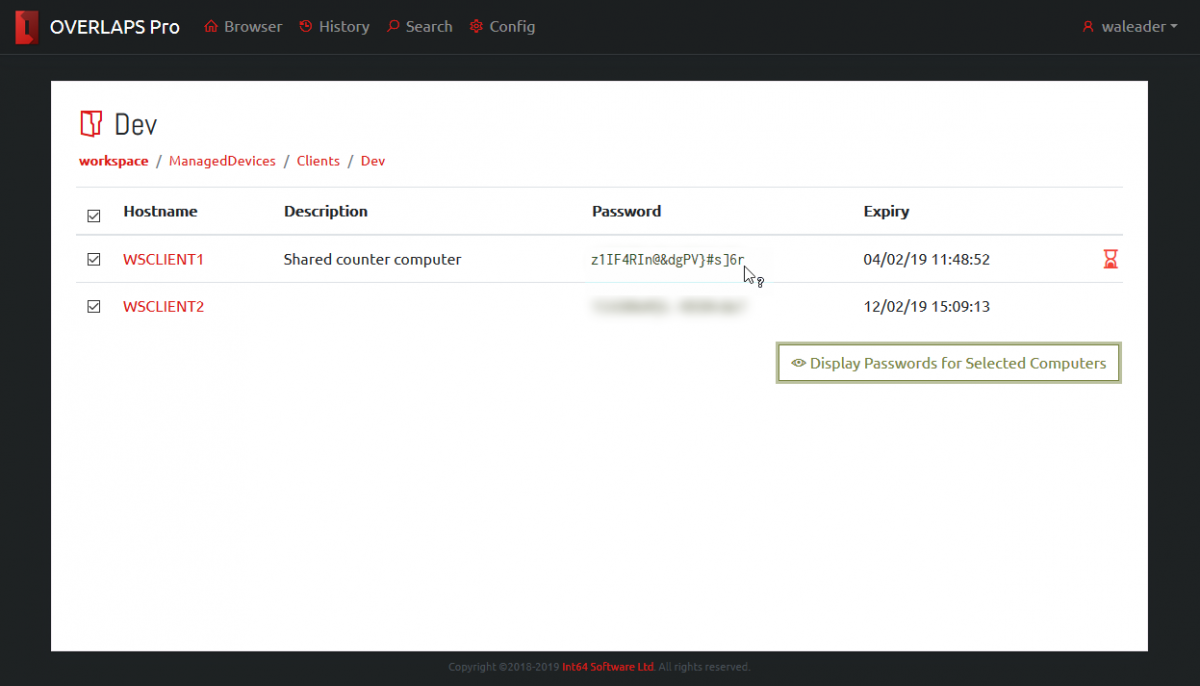
Clicking the “Display Passwords for Selected Computers” button will retrieve the current password information for all of the selected computers. When retrieved, passwords are blurred for security reasons and can be displayed by hovering over the password or toggled between blurred and displayed by clicking.
Computer Status Alerts
Each computer may show an alert icon on the right side of its entry. This indicates that the state of that computer’s LAPS managed password:

This symbol indicates that the LAPS password has expired and is due to be refreshed by the system. If this remains in this state for a long time, it may indicate that the computer is not processing its LAPS policy correctly.

This alert indicates that the computer does not have any LAPS password data in Active Directory. If your LAPS installation is new, or the computer has only recently been added then this may be normal.
Notifications
If you have configured an email server then the Notifications system becomes available. When this happens, a new button will appear in each container.

Clicking this brings up the Manage Notifications window where you can set or remove what notifications you want to receive and how often.
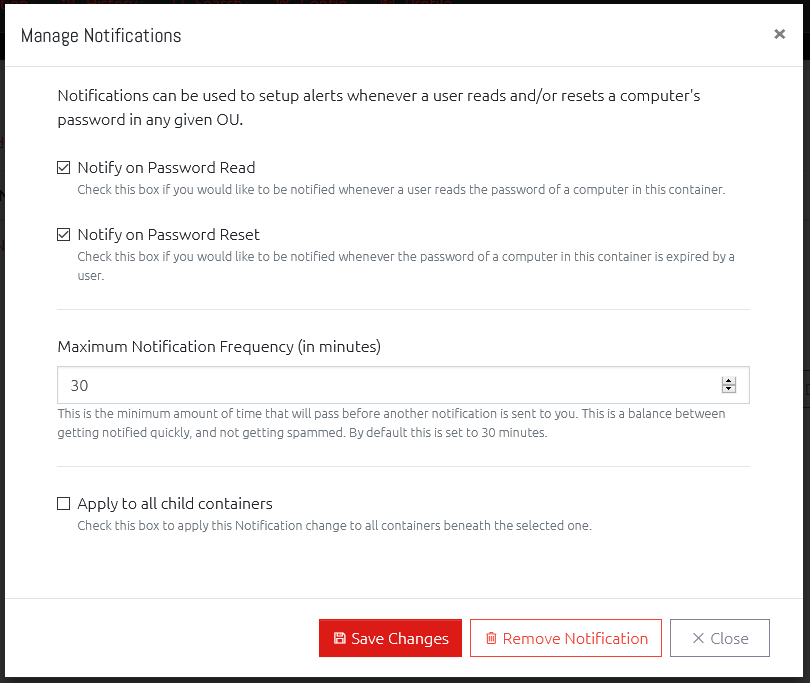
You can have notifications sent to you when anyone reads the password of a computer in this Organisational Unit, expires a password, or both.
Setting the Maximum Notification Frequency will prevent you receiving a notification every time one of these actions happens. Instead they will be grouped together and only sent at the specified frequency.
Finally, you can opt to also apply these notification settings to every Organisational Unit under the currently open container by checking the “Apply to all child containers” box.
History
Navigating to the History section allows you to view historical data from users using OVERLAPS.
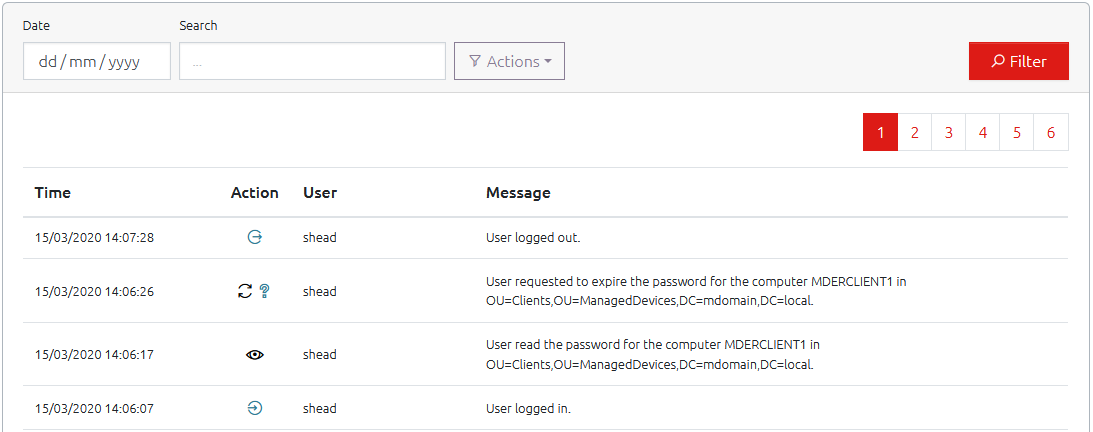
The “Action” provides a quick reference image for each possible type of event that is recorded, where the “Message” field provides more detailed information.
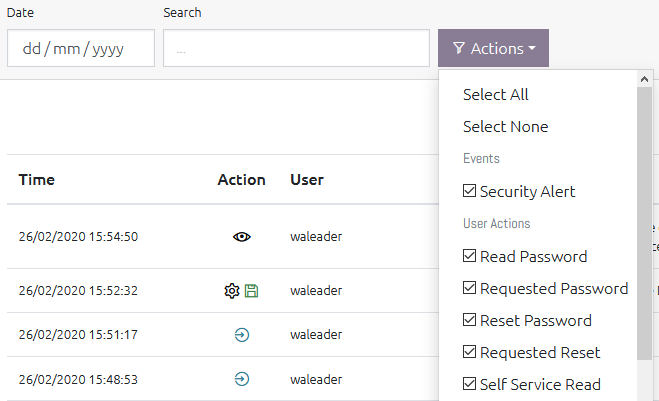
You can filter the History log by Date, Text (both the username and message fields are searched), or by the type of action by using the “Actions” menu and checking the boxes for the type of events you want to see.
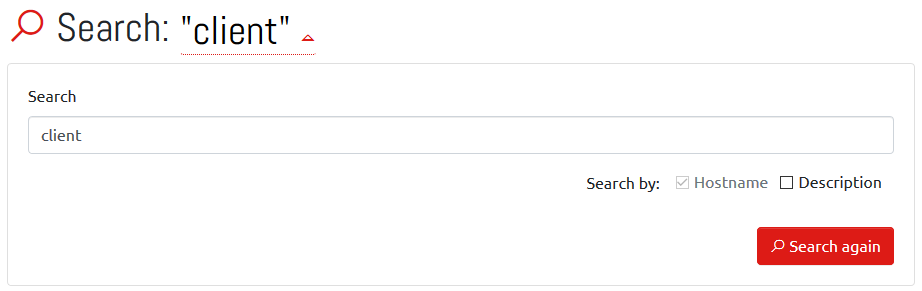
Search

Clicking the Search menu item will present you with a dialog to find computers by their hostname. OVERLAPS will remember the last 10 searches you performed within 30 days and allow you to select from them to perform the search again.
Search results are grouped by Active Directory container, and function just like a normal computer list.
Clicking your search term at the top of the results allows you to refine your search or to include the computer’s description in the search.
Self Service
The Self Service feature allows you to specify individual computers that a user will have permission to retrieve the Administrator password for.
If a user has Self Service computers assigned to them, they will receive an additional menu item (note: if the user has no other Active Directory permissions, then the Browse button will not be available to them).
Computers can be assigned to users in one of two ways when setting up Self Service for that user/group:
- By manually and individually adding the computers,
- By checking the “Include Computers Managed by the User(s)” checkbox.
The latter option will allow the user (or member users if it is a group) to access the passwords for computers which they are identified as the owner of through the Active Directory “Managed By” option.
When they log in, or click Self-Service menu button, the user will be shown their list of Self Service computers and a button for displaying the current Local Administrator password.

All the user needs to do is click the “View Password” button to display that computer’s password.
Profile
Each user now has a few settings that they can change regarding their own experience within OVERLAPS. They get to this by clicking the Profile main menu item.
Language
We have done all of the back-end work required to introduce multiple language support to OVERLAPS now, and we will start to add additional languages as we get the translations done. For now, however, this just acts as a placeholder.
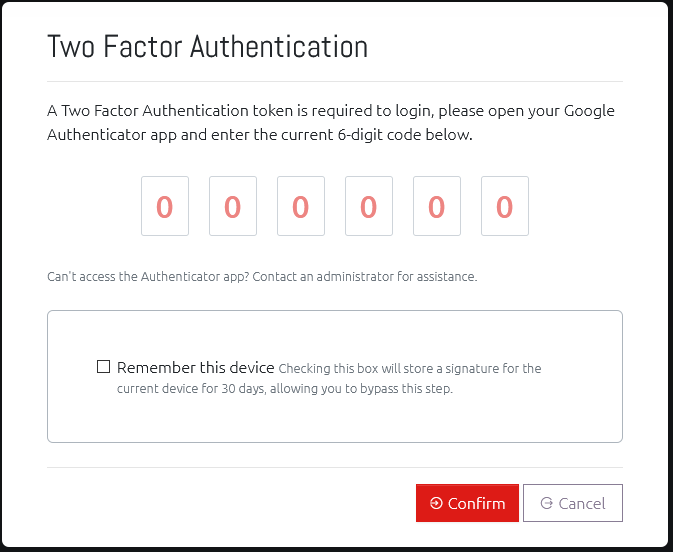
Two Factor Authentication (2FA/TFA/MFA)
Two Factor Authentication (or Multi-Factor Authentication) allows users to further secure their account by requiring the use of a compatible One-Time Password generating app (such as Google Authenticator) on their smartphone.
With this enabled, logging in from a new device will prompt the user to enter an additional code as well as their username and password. The device can then be “remembered”, so they do not need to enter a code the next time, or they can continue to be prompted. Remembered devices are only validated for 30 days, after which they will need to provide a fresh Two Factor Authentication token.
This adds an additional layer of security so that just knowing someone’s domain username and password is not enough to login to OVERLAPS, and it is recommended for all users.
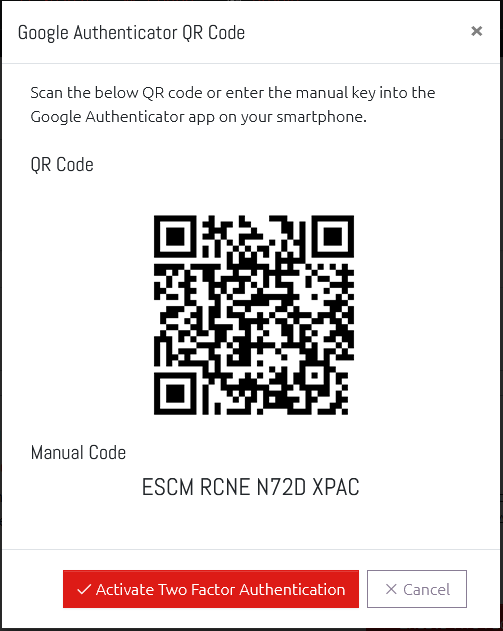
We recommend, and have tested extensively, using the official Google Authenticator app available on the Android Play Store and the Apple App Store.
Other compatible apps may also work.
Once enabled, the user will immediately be taken to the TFA authentication screen to confirm their code. This is the same screen they will see when a new token is required during login.
Remembering your Last Container
Checking this box means that whenever you open the homepage or the Browser window, you will automatically be taken back to the last Organizational Unit that you visited.
Configuration
Use the Config menu item to take you to the OVERLAPS configuration page. Only users with the “Edit Settings” permission are able to view this page.
Users and Groups

Users are managed through the Config page’s Users and Groups section.
Here you will see a list of all of the users and groups that have been added to OVERLAPS and have the ability to edit or remove them.
Add a New User or Group
To add a user, click the “New User/Group”, a window will appear allowing you to enter the user or group’s account (user) name.
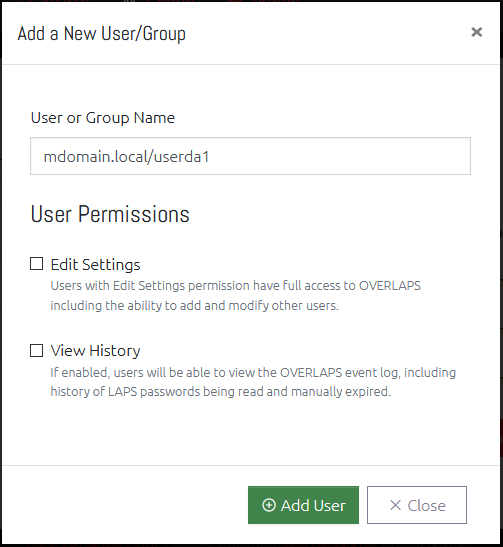
Start typing the username and OVERLAPS will search Active Directory for potential matches for you to select from.
Here you may also select whether the user should be granted Administrator privileges and whether they should be able to view the event history or not.
Edit a User
Select one or more users or groups by checking their entry in the user list, the click the Edit User button to see the options available.
When editing multiple users, you will be shown a dropdown with the selected users.
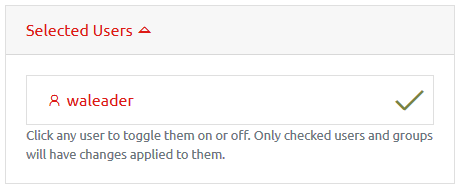
Clicking a user will deselect them, and any changes made when clicking “Save Changes” will not apply to them. Clicking the user again will re-select them.
Rate Limits
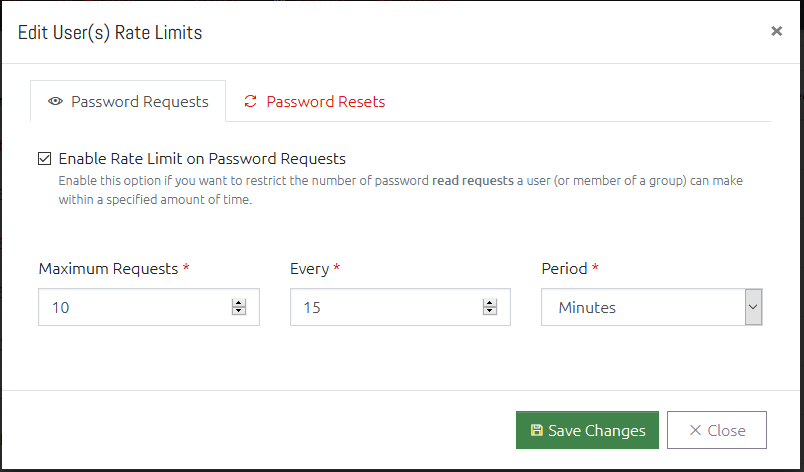
You can set a configurable limit on users and groups which controls how many: a) Password Requests, and b) Password Resets, those users can perform in a given time period.
This can be useful to prevent over-exposure of your Local Administrator passwords, and to prevent a user from mass-exporting them.
Password Request limits and Password Reset limits can be controlled independently. To set a limit:
- Click the checkbox to Enable the limit you want to impose,
- Specify a maximum number of requests (Maximum Requests/Resets) that can be performed in a specific time frame,
- Specify the time span and period that this will be monitored over,
- If the user(s) attempt more than the maximum requests in the given time period, they will be blocked.
For example, for a normal user you may want them to stay under 25 requests per day, so you would set it to – Maximum: 25, Every: 1, Period: Day.
A warning note on group memberships
In order to handle multi-group membership in an efficient and minimally complex way, there is an important point to remember. Where a user is a member of multiple groups, each with its own rate limit, OVERLAPS will select the lowest value all of the rate limit time periods AND the minimum number of requests.
This means if you have a group with a limit of 5 requests every day, and another with a limit of 25 requests every 10 minutes, a member of both groups will end up with the limit 5 requests every 10 minutes.
This is done to be in-line with least privilege best practices. If the need arises to override the rate limit a user is experiencing because of their group memberships, the correct way would be to add the user explicitly to OVERLAPS as explicit users always take priority over group memberships.
User Access Level
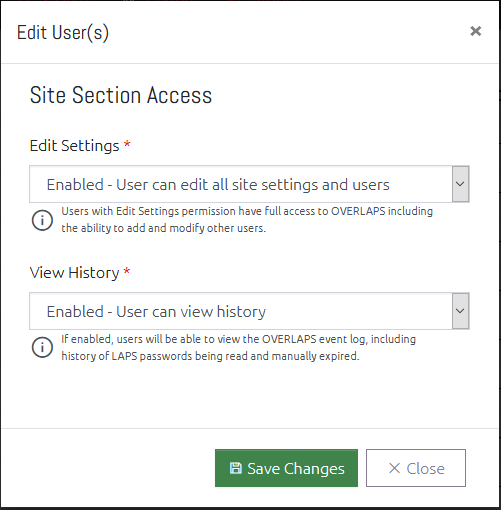
This window allows you to change the overall access that the user(s) have to the OVERLAPS website.
Administrators (users with the Edit Settings permission) have full access to every Active Directory container, and the ability to modify users and site settings. This should be limited to only a few trusted users.
People with “View History” permission have the ability to view a history of all actions undertaken within OVERLAPS.
When editing multiple users, setting an option to “No Change” means that no changes to each users’ current access will be made. Setting it to “Remove” disables the selected access for all selected users, and “Enable” will grant the selected access.
Remove a User
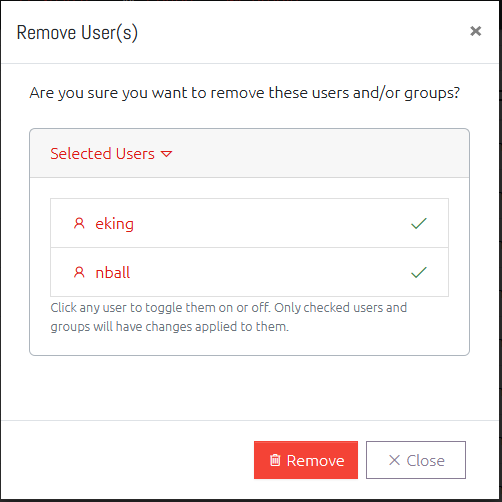
Selecting one or more users and clicking the “Remove” button will prompt you to confirm that you want to remove the user completely from OVERLAPS.
Active Directory Permissions
The user-based permissions have now been replaced with a much simpler Organizational-Unit-based permissions. This is now more like the permissions you would expect to see in Windows or Active Directory itself.
The Permissions section is split vertically into two parts: A navigation tree for finding the container you want to edit, and a list of the Users/Groups who have permission to the currently selected container.
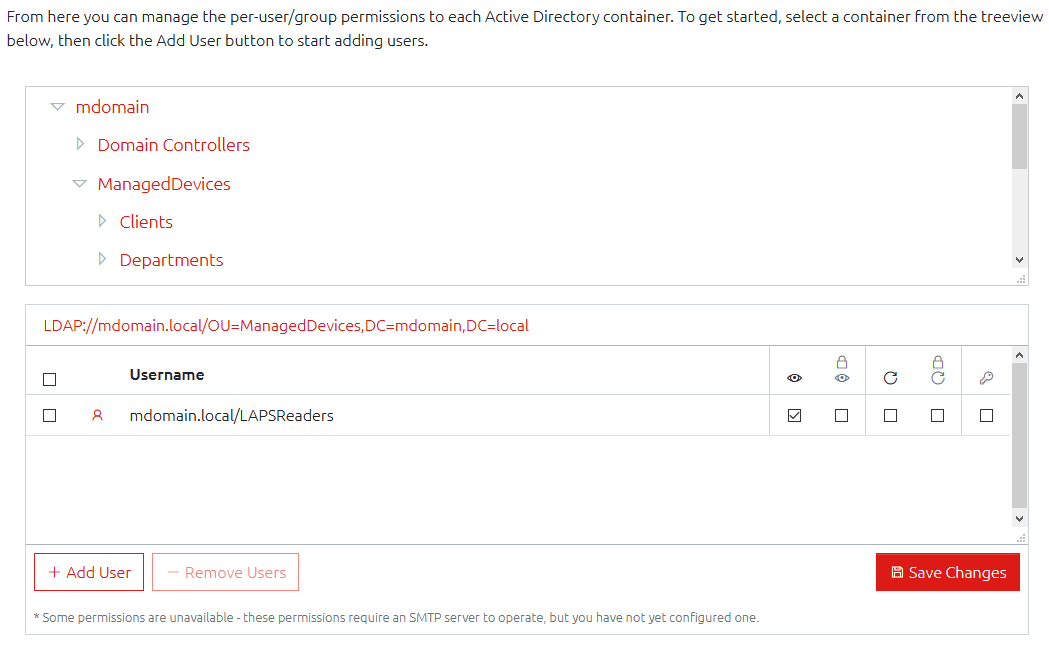
With a valid container selected, you can add or remove users using the relevant buttons, and change their permissions (see below) accordingly, but the permissions are only saved when you click the Save Changes button.
For a full list of the permissions available, see the Setup Guide (download).
Settings, Host and Email Settings
The Settings, Host and Email sections provide access to the OVERLAPS configuration options. For a full explanation of each option, please consult the Setup Guide (download).
Conclusion
Congratulations! You now have an incredible simple yet powerful interface to the wonderful security benefits offered by Microsoft LAPS.
Like the article? Share with your friends: