21. Users and Groups

Users and groups are managed through the Config page’s Users and Groups section.
Here you will see a list of all of the users and groups that have been added to OVERLAPS, and have the ability to edit or remove them.
21.1 Add a New User or Group
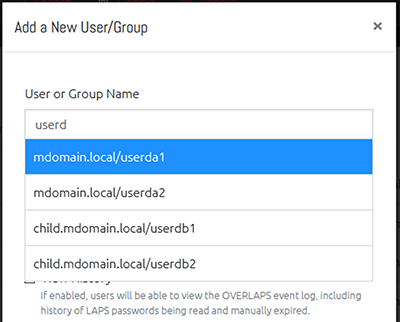
To add a user, click the New User/Group button, a window will appear allowing you to enter the user or group’s account (user) name.
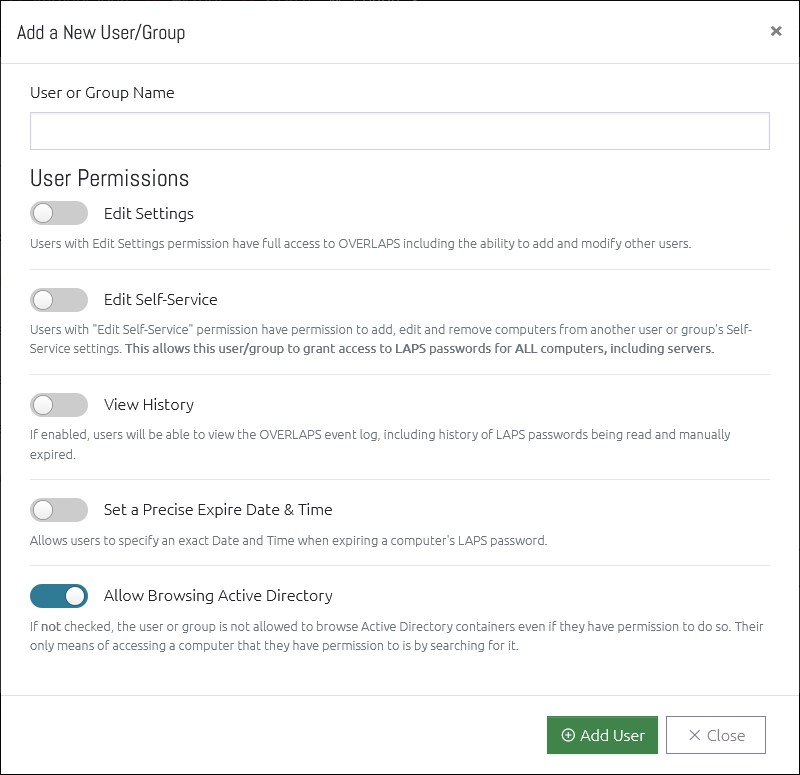
Start typing the username and OVERLAPS will search Active Directory for potential matches for you to select from.
Here you may also set the user or group’s site-wide permissions, which consist of:
Users with this permission are full Administrators have permission to everything in OVERLAPS. They are the only ones who can add or remove users, grant permission to OUs, and change the various system settings.
Warning: This allows the user full access to everything in OVERLAPS, including the ability to grant access to the LAPS password of any computer in the domain, including servers, to any other domain user.
Users with "Edit Self-Service" permission have permission to add, edit and remove computers from another user or group's Self-Service settings. This allows this user/group to grant access to LAPS passwords for ALL computers, including servers.
Users with the View History permission can access the History page and view a log of everything that other users are doing within OVERLAPS.
If enabled, users will be able to run Computer Reports such as retrieving a list of computers that don't have a LAPS password.
If enabled, this user/group can specify a date and time when expiring a computer’s password (instead of just expiring immediately).
If not allowed, the user(s) is will not be able to browse Active Directory containers even if they have permission to do so. Their only means of accessing a computer that they have permission to is by searching for it.
Note that this is not required for users that don't have OU-level permission to access computers (e.g. Self-Service users). It is only intended for situation where you want to grant access to all of the devices in one or more OUs, but only want them to access them through the Search form.
Enabling this for Self-Service-only users can cause unexpected outcomes.
If enabled, all devices that the user has permission to read passwords for (via OU permissions) will be accessible from the Password History report. This includes devices that have been deleted from Active Directory, so it can be useful for gaining access to devices which have dropped out of the domain for one reason or another.
Note that this setting is currently only available from the Edit User Access Levels window, not from the Add User window.
21.2 Editing Users
You can edit users in one of two ways:
21.2.1 Editing Users One at a Time
Click the user or group name in the list to access a dropdown allowing you to view or modify various settings for that user.
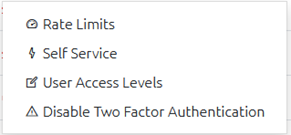
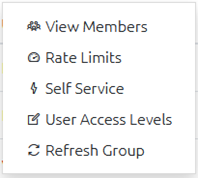
Both Users and Groups have options for editing the Rate Limits (see here), Self Service Computers (see here) and User Access Levels (see here); Groups also have menu options for "View Members" to see what users appear in the group, and "Refresh" Group to have the group updated.
If a user has Two Factor Authentication enabled, you will also see the option "Disable Two Factor Authentication" which can be used to disable this for the user in case they become locked out of their account.
21.2.2 Editing Multiple Users/Groups at the Same Time
Select one or more users or groups by checkbox next to their entry in the user list, then click the Edit User button to edit the Rate Limits, Self Service Computers and User Access Levels for all of them at once.
When you edit multiple users at the same time, the edit window will have an additional Selected Users dropdown that you can use to confirm which users you have selected and toggle them off to exclude them from the edit operation if desired.
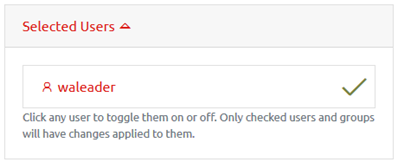
Clicking a user will deselect them, and any changes made when clicking Save Changes will no longer apply to them. Clicking the user again will re-select them, including them in the edit operation again.
21.3 Setting Rate Limits
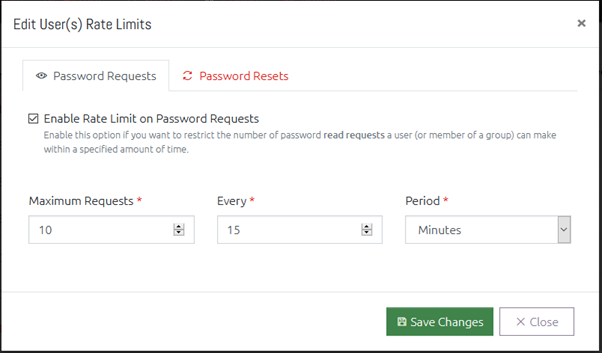
You can set a limit on users and groups which controls how many: a) Password Read Requests, and b) Password Expirations or Resets, those users can perform in a given time period.
This can be useful to prevent over-exposure of your Local Administrator passwords, and to prevent a user from mass-exporting them.
Password Request limits and Password Reset limits can be controlled independently. To set a limit:
- Click the checkbox to Enable the limit you want to impose (use the tabs to switch between Password Requests and Password Resets),
- Specify a maximum number of requests (Maximum Requests/Resets) that can be performed in a specific time frame,
- Specify the time span and period that this will be monitored over,
- If the user attempts more than the maximum requests in the given time period, they will be blocked until that time period has passed.
For example, for a normal user you may want them to stay under 25 requests per day, so you would set it to:
Maximum: 25, Every: 1, Period: Day.
A warning note on group memberships
In order to handle multi-group membership in an efficient and minimally complex way, there is an important point to remember: where a user is a member of multiple groups, each with its own distinct rate limit, OVERLAPS will select the lowest value from each of the rate limit time periods and the number of requests.
This means if you have a group with a limit of 5 requests every day, and another with a limit of 25 requests every 10 minutes, a member of both groups will end up with the limit 5 requests every 10 minutes (5 being the lowest value from the former, and 10 minutes being the lowest from the latter).
This is done to be in-line with least privilege best practices. If the need arises to override the rate limit a user is experiencing because of their group memberships, the correct way would be to add the user explicitly to OVERLAPS's Users and Groups section, as explicit user settings always take priority over group memberships.
21.4 Changing User Access Levels
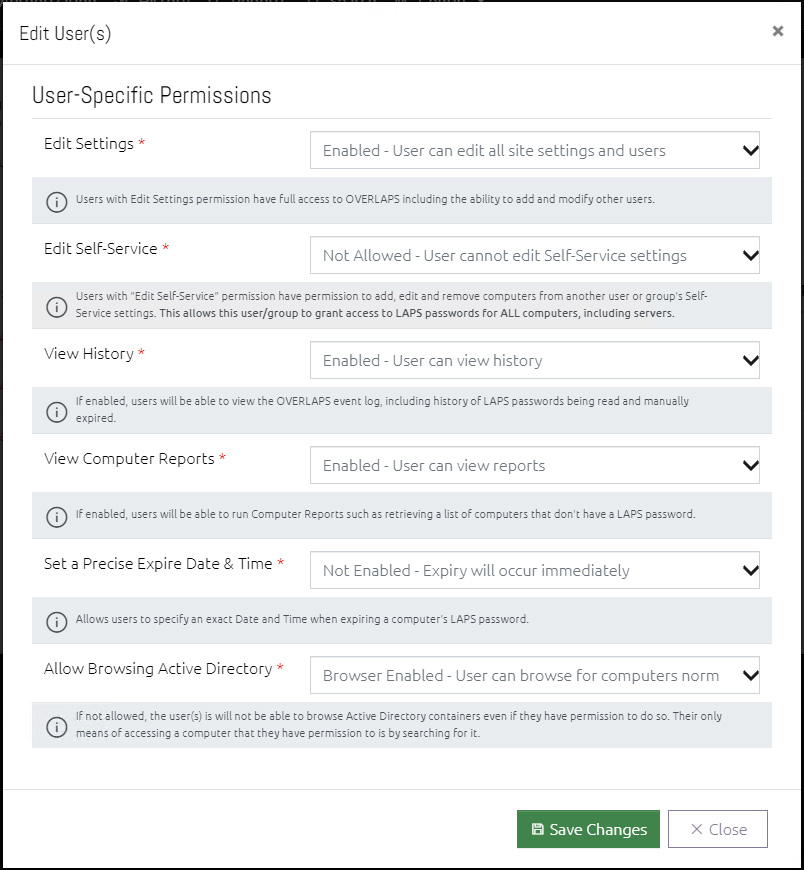
This window allows you to change the overall access that the user(s) have to the OVERLAPS website.
For more information on each setting, see Add a New User or Group.
21.4.1 User Interface Differences when Editing Multiple Users
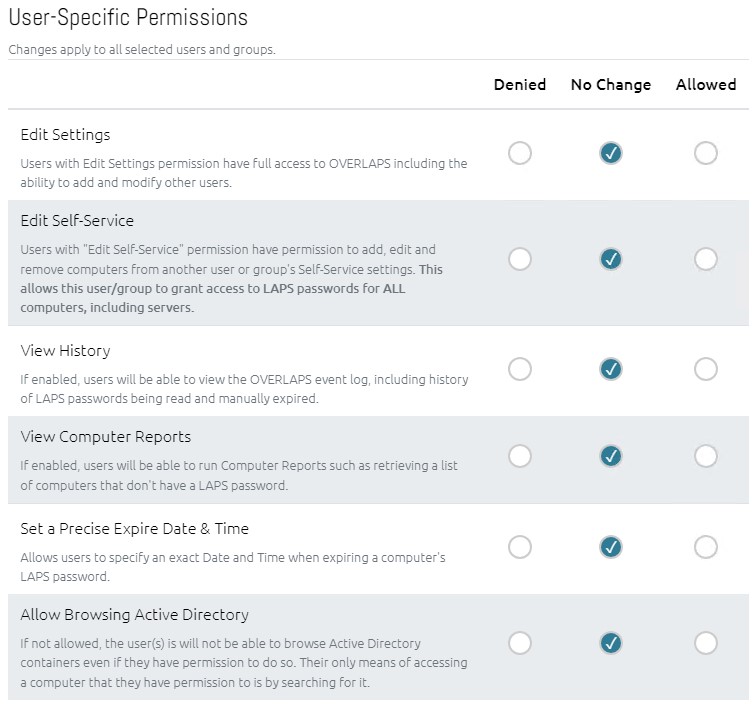
When editing multiple users, setting an option to No Change (default) means that no changes will be made to each users’ current access level for that setting. Setting it to Denied disables the selected access for all selected users, and Allowed will grant the selected access for all selected users.
21.5 Managing User Self Service Computers
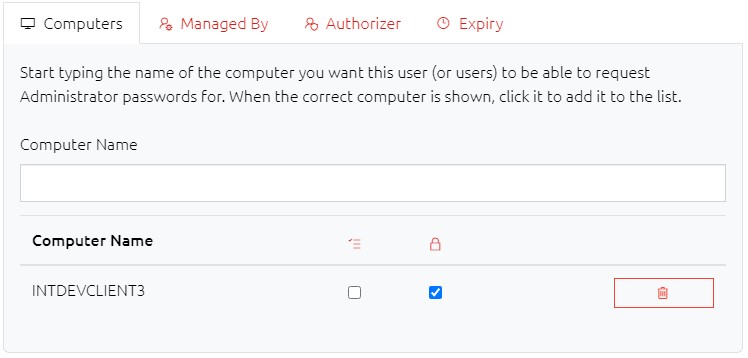
The Self-Service Computers window allows you to specify one or more computers which the selected user(s) or group(s) will be able to access the Local Administrator password for. This allows for “power users” to be setup with access to a small number of computers where granting access to an entire Organizational Unit is not desirable.
Beside the computer name are two checkboxes which are (from left to right): Require Justification and Require Authorisation. These work much the same as regular user permissions where if the first box is checked, the user will be prompted for an explanation of why they're accessing the password, and the second will additionally require an Nominated Authoriser to approve or deny the request before the Self-Service user can actually access the password. Only one of these boxes can be checked at a time for each computer.
21.5.1 Manually Adding Self-Service Computers
To add a computer, start typing its name in the Computer Name field. You will be presented with a list of similar matching computer names from Active Directory.
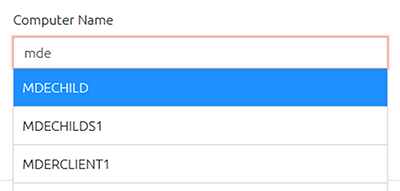
To add one of the displayed computers, simple click its name and it will be added to the list of computers below the computer name box.
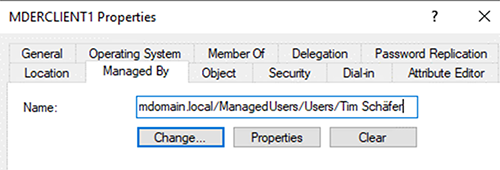
21.5.2 Using Active Directory's "Managed By" Property
An alternative (or addition) to adding the computers one-by-one here is to check one of the Active Directory “Managed By" option under the Managed By tab.
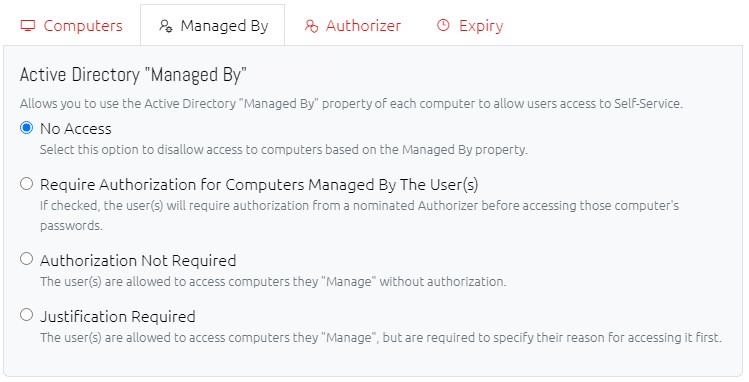
Selecting either the Require Authorization for Computers Managed By The User(s), Authorisation Not Required or Justification Required options will, when a user goes to their Self-Service page, also show a list of any computers that the user is marked as the Manager of through Active Directory.
This can be a quicker way of setting up Self Service if you have already populated this value, or if you are planning to populate it by, for example, exporting the information from SCCM by a script.
For information about the Self-Service experience, see Self Service.
21.5.3 Entra Self Service
Entra devices can be added to Self-Service users from the Entra tab. The two options available are:
- Allowing users to access any device that they are the "Owner" of in Entra.
- Manually added devices by name.
If adding a device by name, check its Device ID matches your records as duplicate names are permitted in Entra.
Neither the Authorisation Request or Justification systems are currently implemented for Entra Self-Service.
21.5.4 Requiring Authorisation
For manually added computers, the Require Authorisation checkbox indicates that the user must first submit an Authorisation Request and have it approved before they can view the computer’s password.
When using the “Managed By” feature, you can also select whether an Authorisation Request is required or not by selecting the appropriate option.
21.5.5 Authoriser
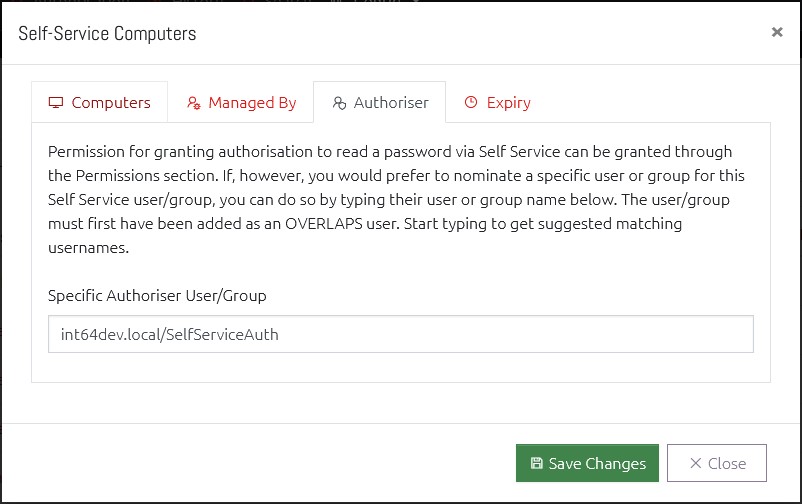
To nominate a user or group who can provide or deny authorisation requests generated by a Self Service user you can use one of two methods:
Authoriser
You can add the Authoriser user or group to the Active Directory container permissions (see Container Permissions), and check the option Authorise Self-Service Access Requests. This will grant the user permission to authorise requests from Self Service users on all computers in this container.
Self-Service Authoriser
Alternatively, you can specify the user/group in the Self-Service settings dialog as shown above. This will allow the user to authorise Self Service requests only on the computers in this Self-Service setup.
21.5.6 Automatic Expiration
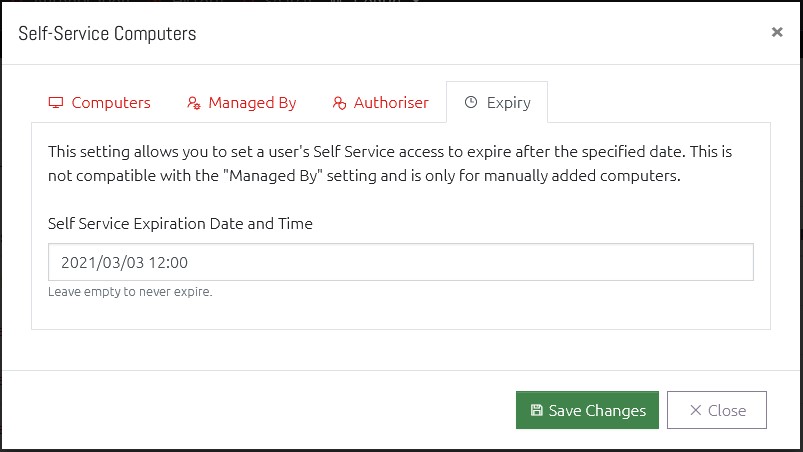
If you want to grant temporary Self-Service access then you can specify an expiry date and time. After this time the user will lose access to all of their Self-Service computers listed under the Computers tab. Note this does not apply to access granted by the Managed By property.
The user is not removed after this expiry date, rather they just lose Self-Service access. This means they can easily be re-activated again at a later date if needed without having to go through the whole setup again.
21.5.7 Moving Computers
It is important to note that, for security reasons, if a computer is moved from its Organizational Unit to another, any users with that computer added to their Self Service computer list will lose access to it until it is removed and re-added to their list.
21.6 Removing a User
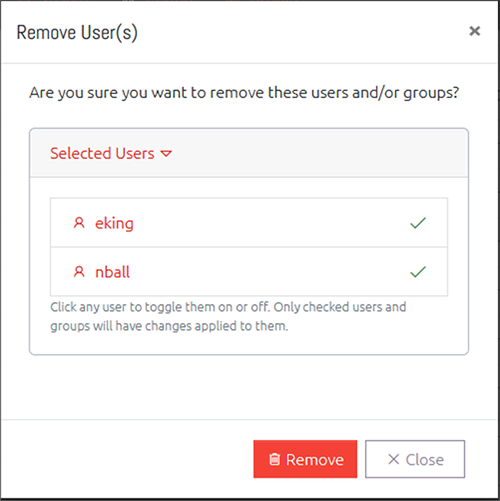
Selecting one or more users and clicking the Remove button will prompt you to confirm that you want to remove the user completely from OVERLAPS. This process is not reversible, and to re-add the user or group you would have to completely set up their settings and permissions again.
21.7 Disabling Expired Account Checks
There are some rare instances where Active Directory may mis-report an account as being expired or disabled when it isn't, preventing them from logging in. If you encounter this condition then you can disable OVERLAPS' internal checks for expired accounts by using the "Disable Account Expiry Checks" individual user menu action.
Note that if the account is actually properly disabled or expired in Active Directory then login will still fail, and this option should only be used as a last resort.