4. First Configuration
This page will guide you through the very first steps you must take with a fresh install of OVERLAPS.
4.1 Adding the First Administrators
Before you can login the first time, you must first add yourself as an Administrator user.
4.1.1 Adding an Administrator from the Configuration Utility
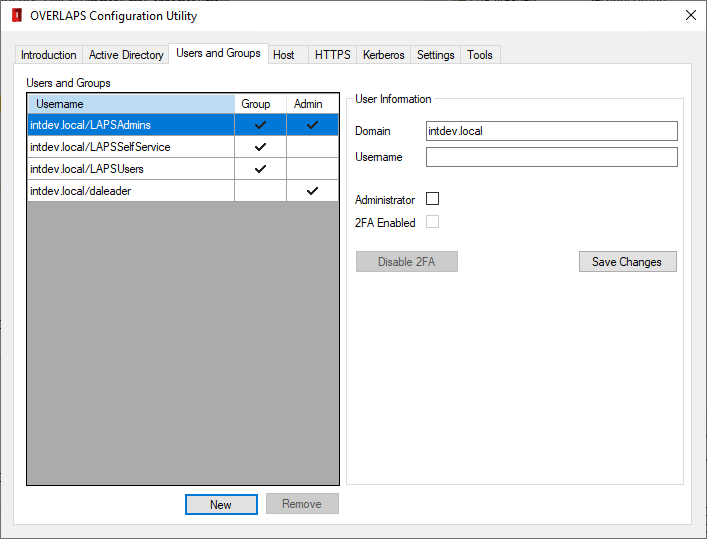
To add an Administrator from the Configuration Utility, navigate to the Users and Groups tab, then:
- Click New
- Enter the domain and username of the user
- Check the Administrator box
- Click Save Changes
The user should now appear in the list on the left of the window with a check under the "Admin" column.
4.1.2 Adding an Administrator from OLconfig.exe
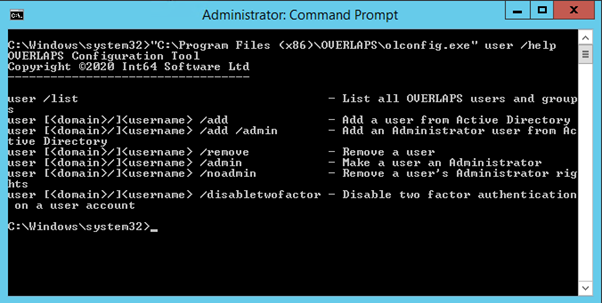
To add an administrator from the command line you can use the olconfig.exe tool as shown below. (substituting “<myusername>” for the user's Active Directory login name).
olconfig.exe user <myusername> /add /admin

4.2 Configuring HTTPS Connection Encryption
To further increase security to OVERLAPS, it is recommended that you install an SSL/TLS certificate so that traffic between the server and a client is encrypted.
Certificates can be obtained from third-party Trusted Authorities (such as Thawte, Comodo SSL, or Let’s Encrypt). They can also be created from your own root certificate or created as standalone self-signed certificates (see Self-Signed Certificate Generator).
Throughout this documentation we will refer to Certificate Binding. This is the process and status of having an SSL/TLS certificate mapped to a particular address on the server, for example its IP address, or a DNS identity such as "overlaps.contoso.com".
For information on how to create a properly-formed self-signed certificate, see our guide here, or use the included Self-Signed Certificate Generator.
Once you have your certificate files (a private key for the server (.pfx or .p12), and a public key for distribution to client devices), you can install and configure encryption using either of the configuration tools, or manually using the Windows “netsh” command. Each of these approaches are detailed below, but we recommend using the Configuration Utility.
4.2.1 Configuring HTTPS using the Configuration Utility
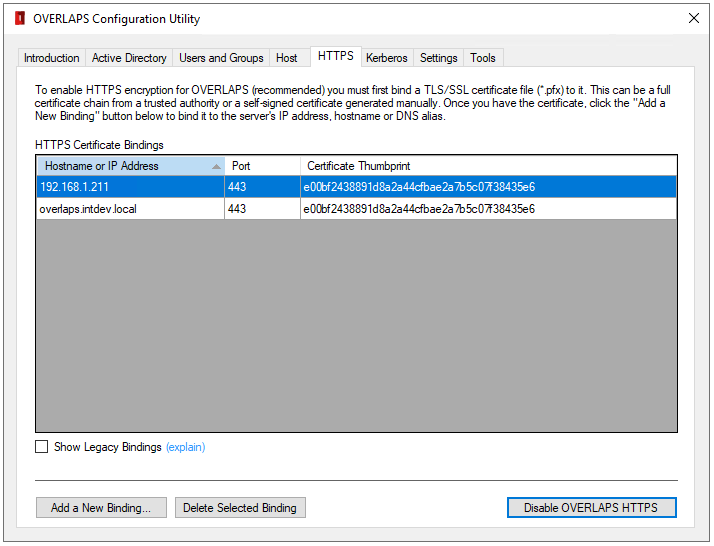
The list of HTTPS Certificate Bindings will be automatically populated with any discovered on the server (only those related to OVERLAPS will be shown).
4.2.1.1 Adding a New Binding
To start adding a new binding, click the “Add a New Binding” button.
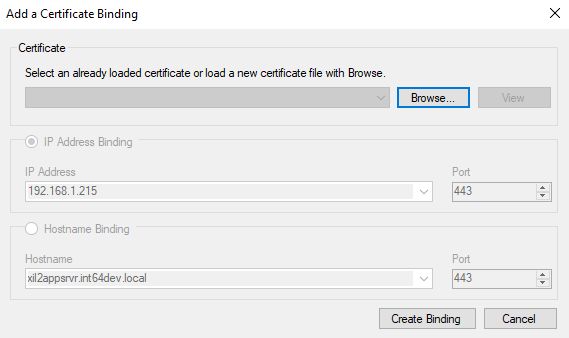
If you have already loaded a certificate this session, it is cached and will appear in the dropdown list so that you don’t have to load it again for each binding. Otherwise, click the “Browse” button to locate and load your private key file (*.pfx).
If the certificate is secured with a password (which private keys normally are), you will be asked to enter it. Then you will be asked to identify the type of certificate.
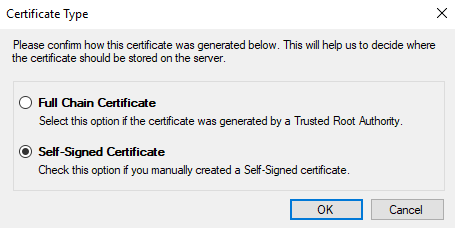
The Configuration Utility will attempt to automatically determine this, but please check that the selected value is correct.
Full Chain Certificate
Select this option if the certificate was generated by a Trusted Root Authority. This can be a third-party authority (e.g. Thawte, Comodo SSL, or Lets Encrypt), or your own company root certificate.
Self-Signed Certificate
Choose this option if the certificate was generated without the involvement of a trusted root authority, such as if it was generated in IIS, OpenSSL, or our own Self-Signed Certificate Generator.
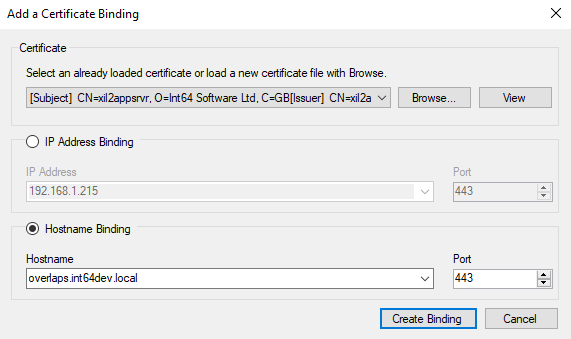
Once the certificate has been loaded or selected, select the target to bind it to (IP Address or DNS Hostname/alias) and either select the desired value from the dropdown list or enter your own.
The port will be automatically set to the HTTPS port configured in OVERLAPS and should not be changed here. If you need to use a different port, consider configuring that in the Host tab first.
Once done, click “Create Binding” to finish the process. If everything is correct, the binding will now appear in the bindings list.

If your certificate is self-signed you will need to distribute the public key part (typically a .cer or .der file) to the Trusted Root Certification Authorities store on any client computer which will be logging into OVERLAPS. This can be done using Group Policy.
Never distribute your private key (.pfx or .p12 file).
4.2.1.2 Deleting an Existing Binding
To delete an existing binding, select it in the list and click the “Delete Selected Binding” button.
4.2.1.3 Enabling or Disabling HTTPS in OVERLAPS
Once a certificate binding has been setup you can tell OVERLAPS to start processing secure requests by clicking the “Enable OVERLAPS HTTPS” button. If this reads “Disable OVERLAPS HTTPS” instead, then OVERLAPS is already configured to listen for HTTPS requests.
4.2.2 Configuring HTTPS using the Configuration Utility Legacy HTTPS Mode
The OVERLAPS HTTPS configuration section was overhauled to provide greater control and clarity when setting it up. However, if you would prefer to go back to the legacy certificate binding tab, click the “Show Legacy HTTPS Configuration Tab” button on the Introduction tab.
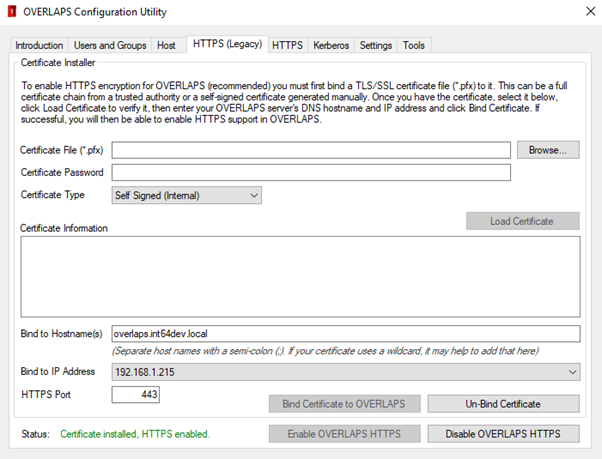
To install the certificate, click browse and locate the .pfx or .p12 certificate file (your private key), and enter the password if required. Then select the correct Certificate Type for the certificate file.
Certificate Type
Depending on the type of certificate (third-party or self-signed), select the Certificate Type from the dropdown. This will effect which Certificate Store it is saved into.
If you find that the process succeeded, but your HTTPS connection keeps failing after hours or days, try unbinding it, changing this value and then re-binding it.
If you have a certificate created from your own internal root certificate then select the option appropriate to that root certificate instead.
Click Load Certificate. The Configuration Utility will attempt to load the certificate file and display its information for you to confirm.
Once loaded, you can then specify the hostname(s), IP address and HTTPS port of your server that you want to bind the certificate to, then click Bind Certificate to OVERLAPS to import and bind the certificate.
If everything works as expected, you can then click the Enable OVERLAPS HTTPS button to set OVERLAPS to host encrypted content.
4.2.2.1 Wildcard Certificates (e.g. *.contoso.com)
Wildcard certificates are supported by OVERLAPS, but when specifying the hostname to bind, enter the actual URL of overlaps (e.g. overlaps.contoso.com) and the wildcard, separating the two with a semicolon. For example:

4.2.3 Configuring HTTPS using olconfig.exe
You can install and configure HTTPS encryption using the olconfig.exe tool in one of two ways:
4.2.3.1 Installing from the certificate file
If you have the certificate file available, you would use the “https /certfile” command, specifying the certificate filename and password (if needed):
olconfig.exe https /certfile <filename.pfx> [/password <password>] /ipaddress <ip address> /port 443
or
olconfig.exe https /certfile <filename.pfx> [/password <password>] /hostname <address> /port 443
For example:
olconfig.exe https /certfile mycertificate.pfx /password SuperSecurePass1 /ipaddress 0.0.0.0 /port 443
olconfig.exe https /certfile mycertificate.pfx /password SuperSecurePass1 /hostname overlaps.contoso.com /port 443
4.2.3.2 Installing from a certificate already in your server’s Certificate Store
If you have already installed the certificate into your server’s certificate store, you can instead use olconfig.exe using the certificate’s thumbprint to identify it:
olconfig.exe https /thumbprint <certificate thumbprint> /hostname <address> /port 443
For example:
olconfig.exe https /thumbprint {BECDF484-E0C1-4B5D-A326-01C0A93B62AB} /hostname overlaps.contoso.com /port 443
When importing your certificate manually it is important that it is installed in the correct Certificate Store:
- Third-Party certificates should be installed in the Current Computer – Trusted Root Certification Authorities store.
- Self-Signed certificates should be installed into the Current Computer - Personal certificate store.
4.2.3.3 Error 1312
An Error 1312 message is not uncommon here and can happen due to a number of reasons in the underlying Windows HTTP API code. Typically it means that when the certificate was imported, it wasn’t marked to be persisted in the server’s certificate cache. If this problem persists, try removing the certificate and re-installing it, or configuring manually using the “netsh” command (see below).
4.2.4 Configuring HTTPS manually
To configure HTTPS manually, first install your certificate file to the appropriate certificate store (see online for instruction on doing this). This will be the Current Computer – Trusted Root Certification Authorities store for third-party certificates (e.g. Thawte, Comodo SSL or Let's Encrypt), or the Current Computer – Personal store for self-signed certificates.
Once the certificate is installed, you can bind it to the OVERLAPS service by using the netsh command line utility as shown below:
4.2.4.1 Bind to an IP Address and Port
netsh http add sslcert ipport=<ip address>:443 certhash=<thumbprint of your certificate> appid={4e893f69-206d-49e3-af7e-5813a2cf0281}
4.2.4.2 Bind to a Hostname and Port
netsh http add sslcert hostnameport=<servername>:443 certhash=<thumbprint of your certificate> appid={4e893f69-206d-49e3-af7e-5813a2cf0281} certstorename=<store>
Where “<store>” will be either “MY” for the Personal store, or “Root” for the Trusted Root Certification Authorities store.
You should receive the message “SSL Certificate successfully added”. If, however, you receive the message “A specified logon session does not exist”, then the certificate could be installed in the wrong store, check that it is in the correct one before trying again.
4.2.5 Enabling HTTPS in OVERLAPS
If you are not using the Configuration Utility, then once HTTPS is configured you will need to enable HTTPS in OVERLAPS from the Configuration page (see Communication Security).
4.2.6 Unencrypted HTTP once HTTPS is enabled
In previous versions it was recommended to then disable the unencrypted HTTP port. However, any attempt to access the HTTP port when HTTPS is enabled will be automatically redirected to the encrypted port, so it is safe to leave HTTP connections enabled.
4.2.7 Troubleshooting HTTPS
There have been reports of HTTPS working initially when bound using the instructions above, but then failing again after a few hours and producing errors on client browsers.
This typically comes down to one of the following problems:
4.2.7.1 Certificates getting removed from their store
Microsoft’s CryptoAPI v2 is responsible for automatically removing certificates from the certificate store, and sometimes it has been known to remove your own trusted certificates.
You can check if this is happening by looking for event code 4108 in your Windows Event Log.
If installing the certificate using the Configuration Utility, make sure you are selecting the correct Certificate Type setting as this will attempt to put it into the correct store. If installing manually, make sure that self-signed certificates are installed into the computer’s Personal store, and third-party certificates are installed into the Third-Party Root Certification Authorities store.
4.2.7.2 Wildcard Certificates
Wildcard certificates (e.g. *.contoso.com) need to be bound using their wildcard as well. For more information, see Wildcard Certificates (e.g. *.contoso.com).
4.2.7.3 Mismatching "Issued To" or Subject Alternative Name (SAN)
The client browser will examine the site’s certificate to make sure that the URL you are visiting matches the address the certificate was created for. It does this by checking the URL against the certificate's Common Name (CN) and Subject Alternative Name (SAN) properties, and if it doesn't find the URL in either of these then it may reject the certificate. Note that, as per RFC 6125, the validation process will check the SAN first and, if it exists, it will ignore the CN property.
4.3 Configuring Kerberos
By default, the OVERLAPS http server will use NTLM when a user selects the option to login with Windows Integrated Authentication (or if this is enforced). While this is fine for most cases, NTLM has been shown to be vulnerable to certain Man-In-The-Middle attacks, so Kerberos is preferred.
To configure Kerberos, you must define a Service Principal Name (SPN) for the server. You can do this in one of two ways: automatically using the either of the configuration tools included with OVERLAPS, or manually using the “setspn.exe” tool provided by Microsoft with Windows.
4.3.1 Configuring Kerberos using the Configuration Utility
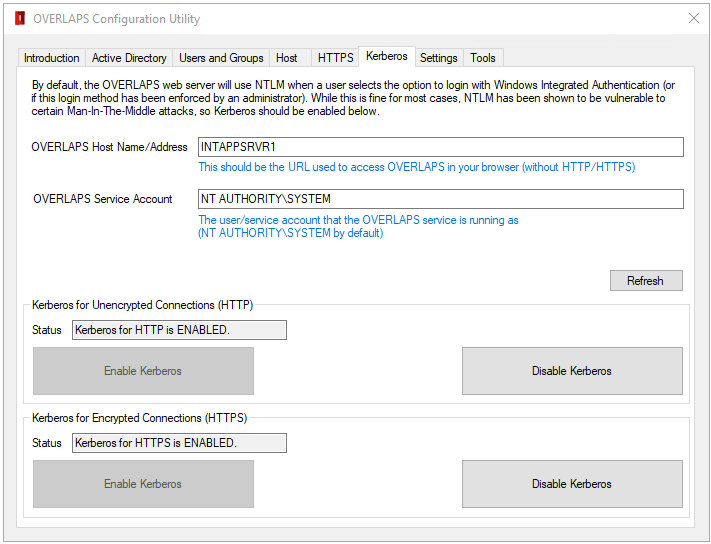
You can create an SPN to enable Kerberos using the Configuration Utility by checking the Host Name and Service Account fields are correct:
4.3.1.1 Host Name/Address
The server name or address used to access OVERLAPS (e.g. overlaps.mydomain.com).
4.3.1.2 Service Account
The account that the OVERLAPS service is running as. This is the server’s Local System account (NT AUTHORITY\SYSTEM) by default.
Click the Refresh button to check the Kerberos configuration for these values.
If Kerberos shows as disabled for either HTTP or HTTPS, you may then click the Enable Kerberos button under HTTP or HTTPS sections to enable Kerberos over the respective connection. Note that the HTTPS section will not be enabled if connection encryption has not yet been setup.
4.3.2 Configuring Kerberos using olconfig.exe
Enabling Kerberos support using the olconfig.exe tool can be achieved very simply with one of the following commands depending on whether you are using HTTP, HTTPS or both HTTP and HTTPS (recommended).
olconfig.exe security /enablekrb http
olconfig.exe security /enablekrb https
olconfig.exe security /enablekrb both
In addition to this, you can specify these optional parameters:
| Parameter | Description |
|---|---|
| /url <hostname/address> | The address of the server (defaults to the hostname) |
| /account <account> | The service account OVERLAPS runs as (defaults to SYSTEM) |
To check the current Kerberos status, you can use the command line:
olconfig.exe security /krbstatus
4.3.3 Configuring Kerberos manually
Alternatively, to register an SPN manually, use the command line:
SetSPN –a HTTP(S)/<servername> <machineaccount>$
So, for example if our server was called “overlaps”, and we wanted to configure both HTTP and HTTPS to support Kerberos we would use the command lines:
SetSPN –a HTTP/OVERLAPS OVERLAPS$
SetSPN –a HTTPS/OVERLAPS OVERLAPS$
For more information on configuring Service Principal Names manually, please refer to Microsoft documentation.