5. Active Directory
5.1 Forests with Multiple Domains
OVERLAPS supports multiple domain environments with a properly configured trust relationship. No special configuration is required to add this feature as OVERLAPS will automatically attempt to determine your domain trust relationships on startup.
5.1.1 Navigating Other Domains
By default, when populating Organizational Units, OVERLAPS will look to the root domain of the forest and from there discover any accessible child domains. However this can be modified from the Configuration Utility’s Settings tab by changing the “MultipleDomainPreference” value to the following:
Seeks the root domain in the current Forest and then attempts to include child domains.
Limits OVERLAPS to the domain that the server is in only. No attempt will be made to attempt to read any other domains in the Forest.
Selects the domain that the OVERLAPS server is a member of first, and then attempts to include any other domains in the current Forest (including the root if it is not the same).
5.1.2 Authentication
In “SingleDomainOnly” mode, user authentication is also limited to the current domain. Otherwise in a multi-domain environment, users will be prompted for their domain prior to logging in (or have to supply it in the form “domain\username” in the case of Windows Integrated Authentication).
Universal Groups are supported for user login, as are per-domain groups.
When adding a user or group in a multi-domain environment, the autosuggest mechanic will search all domains once you start typing and allow you to select from the found users.
5.1.3 Enabling/Disabling Individual Domains
If you are in a multi-domain environment but wish to stop OVERLAPS from talking to one or more of those domains, you can disable them individually from the Config -> Settings -> Active Directory section.
For more information, see Settings - Active Directory.
5.2 Cross Forest Trust Support
In version 2.2.0.0 support was added for authenticating users and groups from other Active Directory Forests with an appropriate trust relationship.
Note that it is still the case that only computers in the current forest can be managed.
5.3 Active Directory Permissions for OVERLAPS
5.3.1 Introduction
OVERLAPS requires access to the LAPS attributes in Active Directory in order to function. This guide assumes you are already familiar with the relevant PowerShell scripts provided by Microsoft for managing this and that you have already configured your computer's Self permission (so that computers have permission to write their passwords to Active Directory). For more information on this, see:
- For Legacy LAPS, the LAPS_OperationsGuide.docx
- For Windows LAPS, see Use Windows LAPS PowerShell cmdlets
5.3.2 Microsoft Legacy LAPS Permissions
In order to view and expire the Legacy LAPS managed Local Administrator passwords, OVERLAPS requires the following permissions in Active Directory to the Organizational Units (containers) in which the managed computers reside:
Read ms-Mcs-AdmPwd
Read ms-Mcs-AdmPwdExpirationTime
Write ms-Mcs-AdmPwdExpirationTime
5.3.2.1 Legacy Permissions Setup
Configuring these permissions manually can lead to unexpected behaviour, so it is recommended to make use of the PowerShell scripts that come with Microsoft LAPS.
As OVERLAPS runs as Local System on the host server by default, you will need the server’s computer account name to proceed unless you are using a designated Service Account (see Settings - Active Directory). This should be the name of the server followed by a dollar sign ($), so if the server is called “myoverlaps” for example, the computer account name would be “myoverlaps$”.
- Launch PowerShell using an account which has the necessary Active Directory modification permissions.
-
Import the LAPS management module by typing:
Import-Module AdmPwd.PS -
Grant read permission to the Local Administrator password property with the command:
Set-AdmPwdReadPasswordPermission -OrgUnit <Distinguished Name of the computer OU> -AllowedPrincipals <Account name> -
Also grant write permission so that you can reset the password expiry time, forcing a reset when LAPS next runs on the client (on a Group Policy update):
Set-AdmPwdResetPasswordPermission -OrgUnit <Distinguished Name of the computer OU> -AllowedPrincipals <Account name> -
Restart the OVERLAPS service to make sure it picks up the new permissions.
If everything went to plan, OVERLAPS will now be able to view and trigger a reset of the Local Administrator passwords. Be aware that, due to AD replication, the permissions may not apply immediately.
5.3.3 Microsoft Windows LAPS Permissions
The new Windows LAPS (which is designed to completely supersede the old product and is now delivered by default to compatible devices) comes with a new set of extensions to the Active Directory Schema to store the new password details.
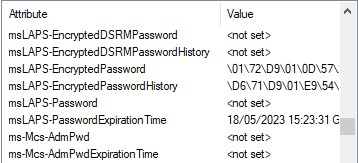
| Attribute | Description |
|---|---|
| msLAPS-EncryptedDSRMPassword | If enabled, and the computer is a Domain Controller, then this will contain the encrypted DSRM password. |
| msLAPS-EncryptedDSRMPasswordHistory | History for the above. |
| msLAPS-EncryptedPassword | If encryption is enabled, the encrypted password data will be stored here. If you're planning to decrypt this
manually, watch out for the prepended header information in the encrypted data.
Once decrypted, this has the same JSON format as “msLAPS-Password”. |
| msLAPS-EncryptedPasswordHistory | History for the above. |
| msLAPS-Password |
The unencrypted password if encryption isn’t enabled. This is stored in JSON format as shown in the example below:
{“n”:”Administrator”,”t”:”1d96ex2d53551ee”,”p”:”password”} Where “n” represents the account name, “t” is the timestamp when the password was updated (in hex format), and “p” is the password. |
| msLAPS-PasswordExpirationTime | This is the date and time that the password is set to expire. It is stored as a 64bit integer in Windows File Time format using UTC as the time zone, the same as legacy LAPS did. |
5.3.3.1 New Windows LAPS Permissions Setup
Like the legacy LAPS, the new version comes with its own PowerShell module for managing permissions. To set them up for OVERLAPS, follow these steps:
- Launch PowerShell using an account which has the necessary Active Directory modification permissions.
-
Grant read permission to the Local Administrator password property with the command (more info):
Set-LapsADReadPasswordPermission -Identity <Distinguished Name of the computer OU> -AllowedPrincipals <Account name> -
Also grant write permission so that you can reset the password expiry time, forcing a reset when LAPS next runs on the client (on a Group Policy update) (more info):
Set-LapsADResetPasswordPermission -Identity <Distinguished Name of the computer OU> -AllowedPrincipals <Account name> -
Restart the OVERLAPS service to make sure it picks up the new permissions.
As with the Legacy commands, if everything went to plan OVERLAPS will now be able to view and trigger a reset of the Local Administrator passwords. Be aware that, due to AD replication, the permissions may not apply immediately.
5.3.3.2 Reading Encrypted Passwords

If you have enabled Password Encryption in your Group Policy settings (Windows LAPS only), then in order to retrieve them using OVERLAPS it must be granted permission to do so.
This is done by adding the OVERLAPS server to the policy:
Computer Configuration -> Policies -> Administrative Templates -> System -> LAPS -> Configure authorized password decryptors
As this policy only accepts a single user entity, it is best to create a group for this setting and add any users (or in this case the OVERLAPS server) to that group. Note, however, that when you change this setting or add a new user, that user will only be able to read passwords that have reset after you make this change, this is because when the encryption occurs it ties it to the current value of this setting.
5.3.3.2.1 An Important Note About Separate Service Accounts
If you are using a Service Account in OVERLAPS instead of the default setup (see Active Directory Credentials) an important distinction needs to be made:
This account, which is used to talk to AD, is the one that needs access to the LAPS attributes, it does not require permission to decrypt anything. This is the account that is used to get the encrypted passwords from AD.
This is the account that needs to be in the Authorized Password Decryptors setting or group. It receives the encrypted password from the above account and then decrypts it in memory.
| Account | Where it is Set | Example | What Permissions it Requires |
|---|---|---|---|
| AD Service Account | Settings -> Active Directory -> Active Directory Credentials | Users\overlaps_sa | Access to the LAPS Attributes in AD (read password, read/write expiration time). |
| OVERLAPS Service Account | Services.msc -> OVERLAPS -> Log On | Servers\overlapsserver$ | Permission to decrypt LAPS passwords. |
If you are not using separate AD credentials (as is the default), then this can be ignored.
5.3.4 Testing the LAPS Permissions
You can test your Active Directory permissions using the LAPS Debug tool within OVERLAPS. See the LAPS Debug tool for more information.
OVERLAPS also includes a pair of command line tools for testing your LAPS permissions: “lapscheck.exe” and “lapscheck_system.exe”. Both allow you to specify the Distinguished Name of either a computer or Organizational Unit in Active Directory to check the LAPS setup.
“lapscheck.exe” also allows you to specify a username and password if you want to check the access of another AD account, while “lapscheck_system.exe” will attempt to check the access that the LOCAL SYSTEM account on the current computer has. The latter is useful for checking the access that OVERLAPS has as this is the account it runs as by default.
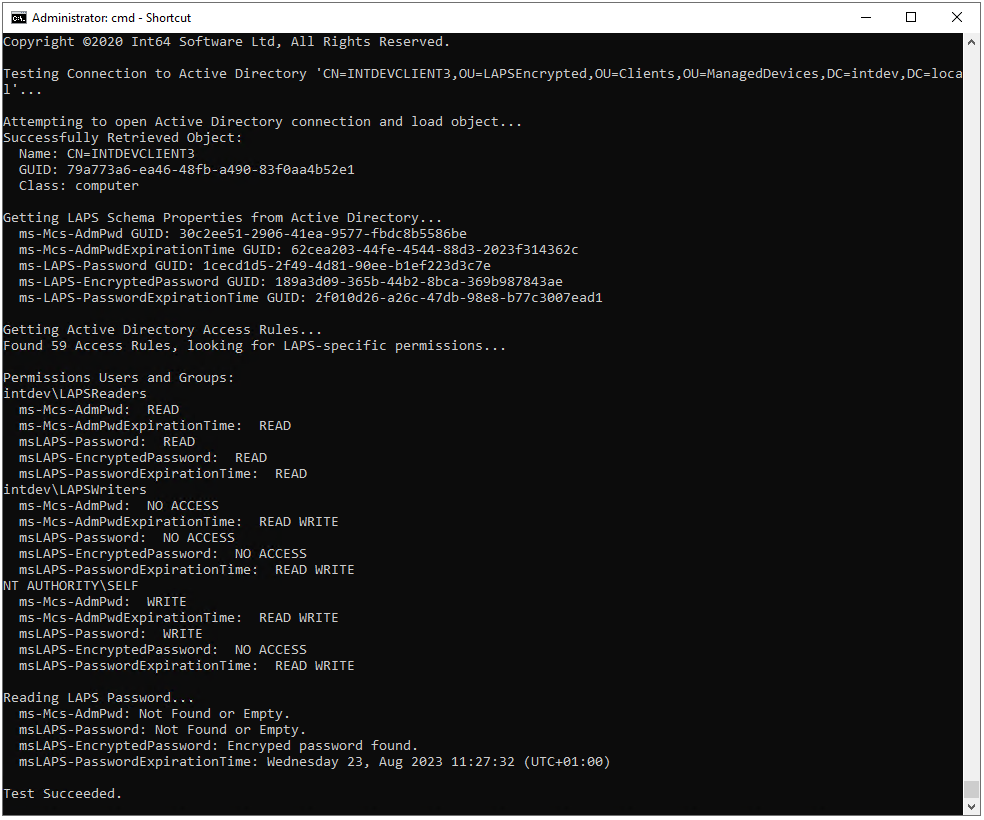
The process followed and problems checked for are:
- Connect to Active Directory and attempt to find the object identified by the provided Distinguished Name.
- Attempt to read schema information about the LAPS properties from Active Directory. If this fails then check that your LAPS installation was successful.
- Get the permissions on the object and search specifically for ones granting read/write permission to the LAPS properties (ms-Mcs-AdmPwd and ms-Mcs-AdmPwdExpirationTime).
- Finally, if the distinguished name is for a computer, attempt to read the LAPS password itself and the expiration time.
If you have any problems with this process, please get into contact with our Support Team for assistance (see Contacting our Support Team).
5.3.5 Multi-Domain Permissions
In multi-domain environments, the LAPS permissions will need to be applied to each domain.
5.3.6 Computer Management Tool Permissions
Most of the Computer Management Tools (CMT) require the Windows Management Instrumentation (WMI) interface to be configured and enabled on your clients, and for the OVERLAPS server to have permission to access it.
If you don’t wish to use the tools which make use of WMI (everything except the Ping tool), then you can ignore this section.
The easiest way to configure WMI is by adding the OVERLAPS server's computer account to the Local Administrators group of the computers it needs to manage.
Alternatively, to setup the precise permissions manually, follow the below guide. Most of these settings are configured in Group Policy except for the first, which must be done on each computer.
5.3.6.1 WMI Namespace Permissions (locally on each computer)
- On the computer to be managed, run wmimgmt.msc in a command prompt
- Right-click WMI Control (Local), and select Properties
- Select the Security tab
- Select Root and click the Security button,
- Click the Add… button
- Click the Object Types button and make sure Computers is selected
- Enter the name of the OVERLAPS server and click Check Names. The computer object of the server is now filled in automatically
- Click OK
- Click Advanced
- Select the OVERLAPS server in the list
- Click Edit
- In the Applies to list, select This namespace and subnamespaces
- Check the permissions boxes for: Execute Methods, Enable Account, Remote Enable and Read Security
- Click OK in each dialog until you have exited back to the main window.
5.3.6.2 User Rights Assignment (Group Policy)
Computer Configuration > Policies > Windows Settings > Security Settings > Local Policies > User Rights Assignment
The OVERLAPS server may require to be added to the following policies to grant it permission to remotely manage computers:
- Act as part of the operating system
- Impersonate a client after authentication
- Log on as batch job
- Log on as a service
5.3.6.3 DCOM Machine Access Restrictions and Machine Launch Restrictions (Group Policy)
Computer Configuration > Policies > Windows Settings > Security Settings > Local Policies > Security Options
- Double click the “DCOM: Machine Access Restrictions…” setting
- Check the “Define this policy setting” box
- Click “Edit Security”
- Click “Add”
- Click “Object Types”
- Check the “Computers” option
- Enter the name of the OVERLAPS server followed by “$” (e.g. “myserver$”)<,/li>
- Click OK
- With the server selected, check the Allow option for “Local Access” and “Remote Access”
- Repeat these steps for “DCOM: Machine Launch Restrictions…”, except checking Allow for all four options.
5.3.6.4 Firewall Setup (if using the Windows Firewall) (Group Policy)
Computer Configuration > Policies > Windows Settings > Security Settings > Windows Firewall with Advanced Security > Inbound Rules
- Right click on the right pane and select New Rule
- Select Predefined and Windows Management Instrumentation (WMI) in the list
- Click Next
- Tick all the Windows Management Instrumentation-rules in the list (usually 3 items)
- Click Next
- Select Allow the Connection
- Click Finish
5.3.6.5 Enable the Windows Management Instrumentation (WMI) and the Remote Procedure Call (RPC) Services (Group Policy)
Computer Configurations > Preferences > Control Panel Settings > Services
- Right click in the right pane, select New -> Service
- Change Startup to Automatic
- Click the “…” button next to “Service name”
- Scroll down to Windows Management Instrumentation (Winmgmt) and select it
- Change “Service action” to “Start service”
- Repeat this for the Remote Procedure Call (RPC) (RpcSs) service.
If you have done all of these steps but are still getting an “Access Denied” or “Privilege not held” error, refer to the Microsoft Support article below:
https://support.microsoft.com/en-au/help/4020459/privilege-not-held-error-with-powershell-stop-computer-command-and-pow
5.3.7 Bitlocker Recovery Key Permissions
If you wish to make use of the ability to retrieve Bitlocker Recovery Keys from Active Directory then the OVERLAPS server must be granted permission to read them.
Bitlocker Keys make use of the Active Directory Confidentiality bit, which is designed to limit visibility of the object or property to only users who have full control access to that object.
There are two ways to grant access to view this data: the quick, easy and arguably less secure way, and the more in-depth but ultimately more secure way. If you are in any doubt as to which method is best for you, or if you require more information, it is recommended to consult official Microsoft's documentation on the topic.
5.3.7.1 The Quick Way
The quick way involves granting OVERLAPS full delegate rights to an Active Directory container in which the Bitlocker secured computers are located.
- Right click the Organizational Unit or Container and click Delegate Control

- This launches the Delegation Control Wizard
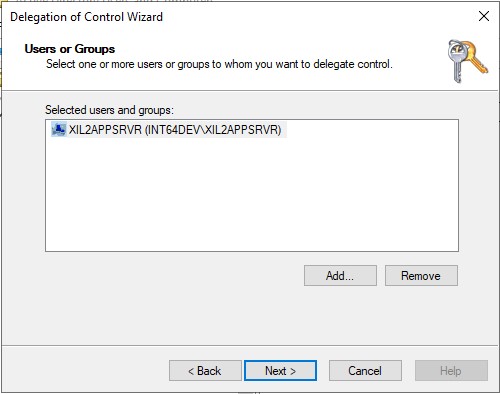
- Click Add and add the OVERLAPS server (if you can't find it, click Object Types and make sure Computers is checked). Note that if you're using a Service Account in the Active Directory settings (see Settings - Active Directory), then enter that account instead.

- Click OK to add the server to the Users or Groups list, click Next
- Select Create a custom task to delegate
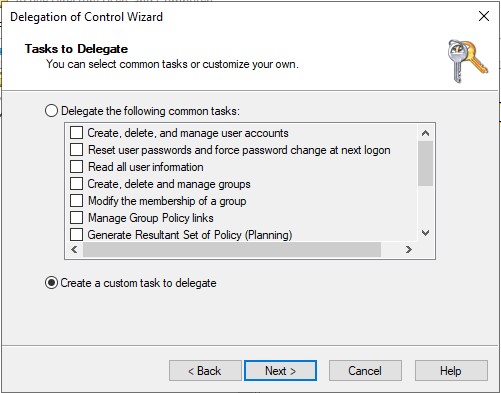
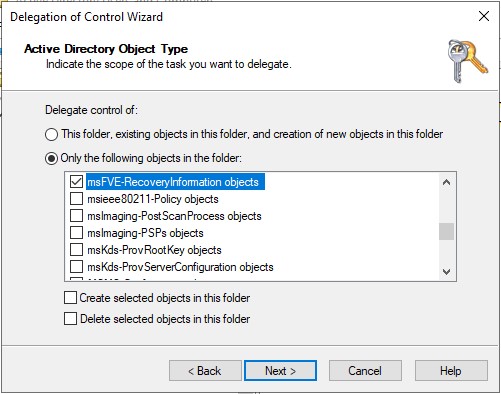
- Select Only the following objects in the folder, then check msFVE-RecoveryInformation objects, then click Next
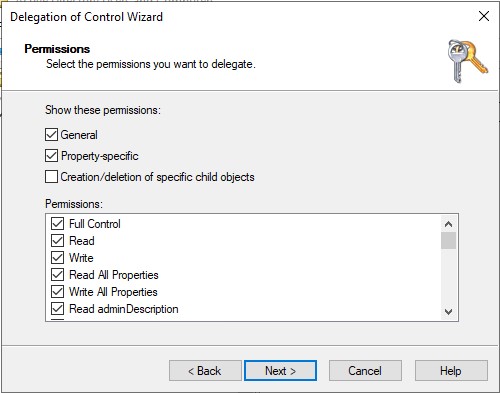
- Select the Full Control checkbox, then click Next
5.3.7.2 The More Secure Way
More advanced control over access to the Bitlocker Recovery Key object can be achieved using Microsoft's Ldp.exe tool. This involves directly editing the ACL Security Descriptor on an OU and can lead to unexpected results, this should only be carried out by an experienced person who is confident in what they are doing.
The basic logic is that any property or object with the Confidentiality bit set requires a user with the "Control Access" permission to access it. The only way to achieve this when editing an OU's permissions normally is by granting Full Control to it. This unfortunately necessitates giving up far more control over the container/object than is actually necessary though. However, by setting an Access Control Entry (ACE) manually through Ldp.exe, you can specify only the permissions you actually need. The steps to achieve this are shown below.
-
Run Ldp.exe
-
Connect to a Domain Controller by going to Connection -> Connect, and entering it's details.
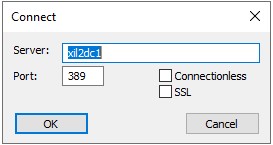
You should see that a connection has been established.
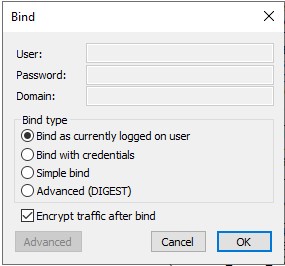
- Set the Server Binding Information by going to Connection -> Bind.
- Open your Active Directory tree by going to View -> Tree, and clicking OK (leaving BaseDN empty).
- Navigate to the OU containing your Bitlocker secured devices
- Right click the OU and select Advanced -> Security Descriptor
- When prompted to confirm the Distinguished Name (DN) of the object to edit, click OK.
- You will see the Security descriptor for the container object.
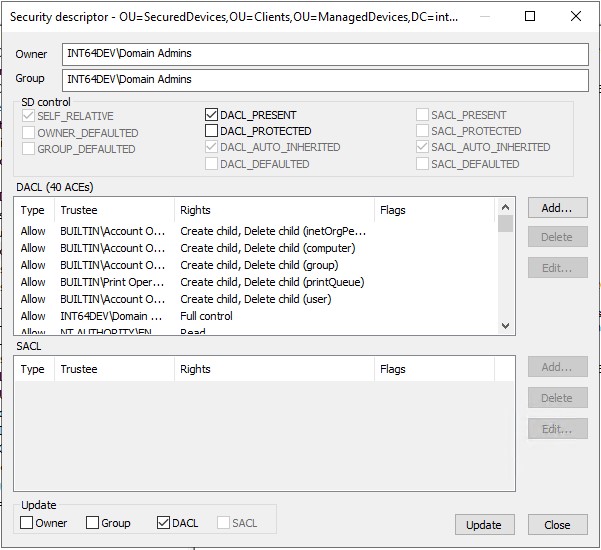
-
To add an ACE, click the "Add..." button.
-
Fill out the information for the new ACE as shown in the example below. In this example we have created a group "BitlockerReader" to control access so that we don't have to go in and edit ACEs every time we want to make a change:
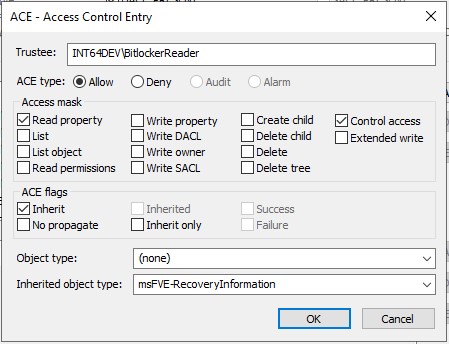
The fields to edit are:
- Trustee: The User or group name in the form domain\username
- ACE type: Allow
- Access Mask: Read property, Control Access
- ACE flags: Inherit
- Object Type: (none)
- Inherited Object Type: msFVE-RecoveryInformation
Once done, click OK to add the ACE to the container and then click Update to apply the change. Changes made here may take some time (possibly up to 4 hours) to propagate through AD, and may require the OVERLAPS service to be restarted to take effect.
You can read more about the Confidential bit and granting permission to read properties at: https://docs.microsoft.com/en-us/troubleshoot/windows-server/windows-security/mark-attribute-as-confidential