19. User Profile
Each user has a profile featuring settings that they can change which will effect their own experience within OVERLAPS. The profile settings screen can be accessed from the main menu by clicking your username and then selecting Profile.
19.1 Language
Allows you to select your display language. Currently OVERLAPS supports:
- British English (en-GB)
- U.S. English (en-US)
- French (fr-FR)
- German (de-DE)
- Italian (it-IT)
- Spanish (es-ES)
Non-English languages are provided by machine translation which we do our best to verify, however we know that mistakes can occur so if you notice anything then please let us know by contacting Support. If your language isn't in the list above but you would like it to be, please also get in touch.
19.2 Two Factor Authentication
Two Factor Authentication (2FA/TFA), or Multi-Factor Authentication (MFA) allows users to further secure their account by requiring the use of a compatible Time-based One-Time Password (TOTP) generating app such as Google Authenticator or Microsoft Authenticator on their smartphone.
With this enabled, logging in from a new device will prompt the user to enter an additional code as well as their username and password. The device can then be “remembered”, so they do not need to enter a code the next time, or they can continue to be prompted. Remembered devices are only valid for 30 days, after which they will need to provide a fresh Two Factor Authentication token.
This adds an additional layer of security so that just knowing someone’s domain username and password is not enough to login to OVERLAPS, it is recommended that all users enable the feature.
19.2.1 Getting an Authenticator App
We conduct thorough testing using the official Google Authenticator and Microsoft Authenticator apps, both of which are available on the Android Play Store and the Apple App Store.
Other compatible TOTP apps should also work.
19.2.2 Enabling Two Factor Authentication
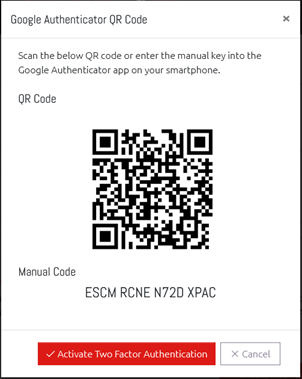
To enable Two Factor Authentication, click the “Enable Two Factor Authentication” button. You will be presented with a window showing both the QR Code and manual code which can be entered into their authenticator app (only one or the other is required).
19.2.2.1 Scanning the QR Code
To add OVERLAPS to your authenticator app, click the button to add a new account and select the option to “Scan a barcode”. Your camera will active, simply point it at the on-screen QR code to add OVERLAPS.
19.2.2.2 Entering the Manual Code
As above, click the button to add a new account to Google Authenticator, but select “Enter a provided key”. You can then enter the “Manual Code” provided in OVERLAPS.
19.2.3 Logging in with Two Factor Authentication
Once enabled, the user will immediately be taken to the TFA authentication screen to confirm their code. This is the same screen they will see when a new token is required during login.
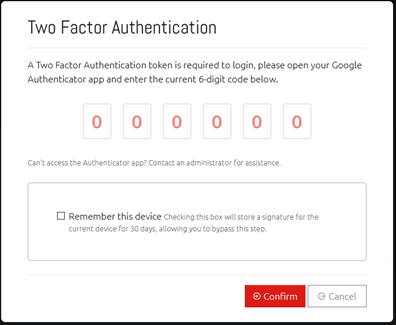
Just type in the code displayed in your authenticator app to proceed.
19.2.4 Disabling Two Factor Authentication
Two Factor Authentication can be disabled from the Profile screen. If a user loses access to their account due to a problem with their Authenticator app (or, for example, getting a new phone), Administrators can disable it for them from the Users and Groups screen (see Editing Users).
If Two Factor Authentication is enforced through the Site Settings (Two Factor Authentication Settings), then users cannot disable it. Administrators can, however, remove 2FA from a user’s account to force them to re-register. This is provided in case a user loses access to their phone or their Authenticator app and needs to reset it.
19.3 Settings
19.3.1 Website Colour Scheme
This controls whether the Light or Dark website colour scheme is displayed. Leaving this set to Automatic will use the theme your Operating System or browser is set to.
There is also a High Contrast Theme for users with visual impairments or low vision.
19.3.2 Always remember and restore the last Organizational Unit I browsed to
Checking this box means that whenever you open the homepage or the Browser window, you will automatically be taken back to the last Organizational Unit that you visited even if you've logged out and logged back in.
19.3.3 Program Update Notifications
If your OVERLAPS settings are configured to allow it to check for program updates and you would like to get a popup notification when an update is available, you can select to do so from this section.
The options are for notifications when a major update is released (e.g. 1.0.0 to 1.1.0), and/or when a minor update is released (e.g. 1.0.0 to 1.0.1). The former usually consist of major new features, system upgrades or fixes for significant bugs; while the latter are normally released to fix minor bugs.
19.4 Notification Settings
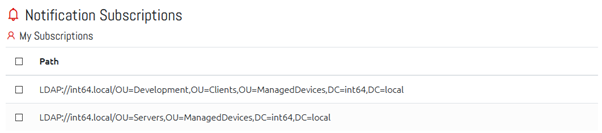
This section lists all of the containers that the current user has notifications (for password read/resets) setup on. Notifications can be selected using the checkbox and removed by clicking the Delete Selected Subscriptions button.